
3Com Switch 7750 Configuration Guide Guide


SSH Terminal Services 725
# Start the SSH client software on the host which stores the RSA private keys and
make corresponding configuration to establish an SSH connection.
SSH Client Configuration
Example
Network requirements
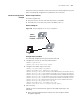
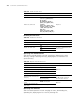
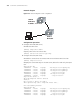
As shown in Figure 188,
■ Switch A serves as an SSH client with user name as client003.
■ Switch B serves as an SSH server, with its IP address 10.1.1.3.
Network diagram
Figure 188 Network diagram for SSH client configuration
Configuration procedure
The following configurations are performed on Switch B.
1 Configure the client to run the initial authentication.
<SW7750> system-view
[SW7750] ssh client first-time enable
2 Configure server public keys on the client.
[SW7750] rsa peer-public-key public
[SW7750-rsa-public-key] public-key-code begin
[SW7750-rsa-key-code] 308186028180739A291ABDA704F5D93DC8FDF84C427463
[SW7750-rsa-key-code] 1991C164B0DF178C55FA833591C7D47D5381D09CE82913
[SW7750-rsa-key-code] D7EDF9C08511D83CA4ED2B30B809808EB0D1F52D045DE4
[SW7750-rsa-key-code] 0861B74A0E135523CCD74CAC61F8E58C452B2F3F2DA0DC
[SW7750-rsa-key-code] C48E3306367FE187BDD944018B3B69F3CBB0A573202C16
[SW7750-rsa-key-code] BB2FC1ACF3EC8F828D55A36F1CDDC4BB45504F020125
[SW7750-rsa-key-code] public-key-code end
[SW7750-rsa-public-key] peer-public-key end
[SW7750] ssh client 10.1.1.3 assign rsa-key public
3 Start SSH client.
Settings for the two authentication types are described respectively in the
following:
■ Use the password authentication and start the client using the default
encryption algorithm.
PC
IP address ˖10.165.87.136
SSH Client
Sw itch B
SSH Se rver
Switch A
PC
IP address ˖10.165.87.136
SSH Client
Sw itch B
SSH Se rver
Switch A