
3Com Switch 7750 Configuration Guide


6
LOGGING IN THROUGH THE
W
EB-BASED NETWORK MANAGEMENT
SYSTEM
Introduction A Switch 7750 has a Web server built in. It enables you to log into a Switch 7750
through a Web browser and then manage and maintain the switch intuitively by
interacting with the built-in Web server.
To log into a Switch 7750 through the built-in Web-based network management
system, you need to perform the related configuration on both the switch and the
PC operating as the network management terminal.
Establishing an HTTP
Connection
1 Assign an IP address to VLAN-interface 1 of the switch (VLAN 1 is the default
VLAN of the switch). See “Telneting to a Switch from a Terminal” on page 62 for
related information.
2 Configure the user name and the password on the switch for the Web network
management user to log in.
# Create a Web user account, setting both the user name and the password to
“admin” and the user level to 3.
<SW7750> system-view
[SW7750] local-user admin
[SW7750-luser-admin] service-type telnet level 3
[SW7750-luser-admin] password simple admin
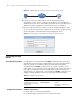
3 Establish an HTTP connection between your PC and the switch, as shown in
Figure 18.
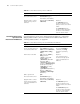
Table 31 Requirements for logging into a switch through the Web-based network
management system
Item Requirement
Switch The VLAN interface of the switch is assigned an IP address, and
the route between the switch and the Web network
management terminal is reachable. (Refer to “Configuring an IP
Address for a VLAN Interface” on page 129 and “IP Routing
Policy Configuration” on page 377 for related information.)
The user name and password for logging into the Web-based
network management system are configured.
PC operating as the
network management
terminal
IE is available.
The IP address of the VLAN interface of the switch, the user
name, and the password are available.