
3Com Switch 7750 Configuration Guide


780 CHAPTER 71: SSH TERMINAL SERVICES
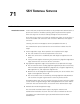
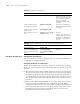
Network diagram
Figure 202 Network diagram for SSH server configuration
Configuration procedure
1 Generate a local RSA key pair.
<SW7750> system-view
[SW7750] rsa local-key-pair create
n
If the local RSA key pair has been generated in previous operations, skip this step
here.
2 Set authentication type.
Settings for the two authentication types are described respectively in the
following:
■ Password authentication
# Set AAA authentication on the user interfaces.
[SW7750] user-interface vty 0 4
[SW7750-ui-vty0-4] authentication-mode scheme
# Set the user interfaces to support SSH.
[SW7750-ui-vty0-4] protocol inbound ssh
# Configure the login protocol for user clinet001 as SSH and authentication type
as password.
[SW7750] local-user client001
[SW7750-luser-client001] password simple abc
[SW7750-luser-client001] service-type ssh
[SW7750-luser-client001] quit
[SW7750] ssh user client001 authentication-type password
n
Select the default SSH authentication timeout time and authentication retry times.
After these settings, run the SSH2.0-supported client software on other hosts
connected to the switch. Log in to the switch using username client001 and
password abc.
■ RSA public key authentication
# Set AAA authentication on the user interfaces.
[SW7750] user-interface vty 0 4
[SW7750-ui-vty0-4] authentication-mode scheme
# Set the user interfaces to support SSH.
SSH client SSH server
Host Switch