
3Com Switch 8800 Family Configuration Guide


Configuring OSPF 313
Perform the following configuration in system view.
To ensure stability of OSPF, the user should determine the division of router IDs and
manually configure them when planning the network.
Enabling OSPF Perform the following configuration in system view.
By default, OSPF is disabled.
When enabling OSPF, pay attention to the following points:
■ The default OSPF process ID is 1. If no process ID is specified in the command,
the default one is adopted.
■ If a router is running multiple OSPF processes, you are recommended to use
router-id in the command to specify different router IDs for different
processes.
Entering OSPF Area
View
OSPF divides an AS into different areas or logical groups of routers.
Perform the following configuration in OSPF view.
The area-id parameter identifies an area. It can be a decimal integer in the range
of 0 to 4,294,967,295, or in the format of IP address. Regardless of how it is
specified, it is displayed in the format of IP address.
Note that when you configure OSPF routers in the same area, you should apply
most configuration data to the whole area. Otherwise, the neighboring routers
cannot exchange information. This may even block routing information or create
routing loops.
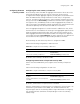
Specifying an Interface
to Run OSPF
After using the ospf command to enable OSPF in system view, you must specify
the network to run OSPF. An ABR router can be in different areas, while a network
segment can only belong to an area. That is, you must specify a specific area for
each port running OSPF.
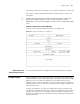
Tab le 270 Configure router ID
Operation Command
Configure router ID router id router-id
Remove the router ID undo router id
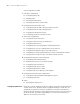
Tab le 271 Enable/Disable OSPF
Operation Command
Enable OSPF and enter OSPF view
ospf [ process-id [ router-id router-id |
vpn-instance vpn-instance-name]]
Disable one or all OSPF processes undo ospf [ process-id ]
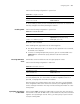
Tab le 272 Enter OSPF area view
Operation Command
Enter OSPF area view area area-id
Delete an OSPF area undo area area-id