
H3C S7502 Ethernet Switch Installation Manual

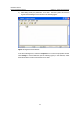
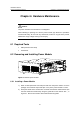
Table Of Contents
- 00-1Cover.pdf
- 01-Chapter 1 Product Overview.pdf
- 02-Chapter 2 Line Processing Units.pdf
- 03-Chapter 3 nstallation Preparations.pdf
- 04-Chapter 4 Hardware Installation.pdf
- Chapter 4 Hardware Installation
- 05-Chapter 5 System Commissioning.pdf
- 06-Chapter 6 Hardware Maintenance.pdf
- 07-Chapter 7 Software Maintenance.pdf
- Chapter 7 Software Maintenance
- 7.1 Introduction to Loading Approaches
- 7.2 Loading Software Locally through Boot Menu
- 7.3 Loading Software Remotely or Locally through Command Lines
- 7.4 Booting the Switch with Dual Images
- 7.5 Loading a Host Software Containing the Boot ROM File
- 7.6 Handling Loading Failure
- 7.7 Handling Password Loss
- Chapter 7 Software Maintenance
- 08-Chapter 8 Troubleshooting.pdf
- 09-Appendix A Lightning Protection.pdf
- 10-Appendix B AC Power Cables Used in Different Countries.pdf
Installation Manual
H3C S7502 Ethernet Switch Chapter 6 Hardware Maintenance
6-3
2
2
3
3
1
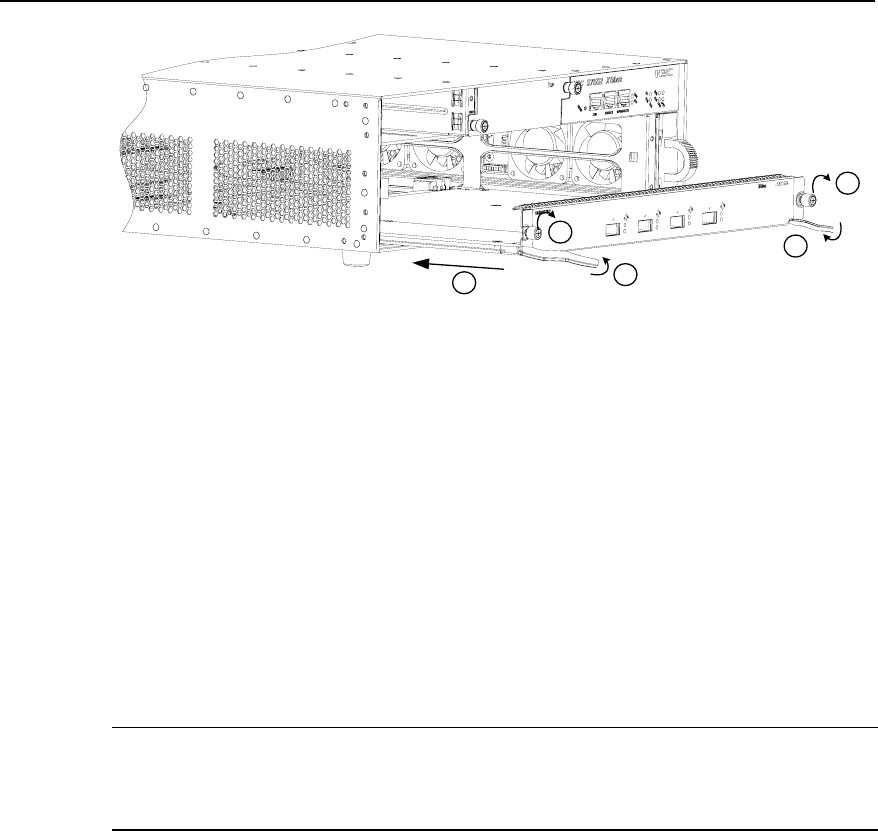
Figure 6-2 Install a card
6.3.1 Installing a Card
1) Wear an ESD-preventive wrist strap and loose the captive screws on the blank
panel on the slot, where the card should be inserted.
2) Hold the ejector levers on the card with both hands and pull them outward. Slide
the card into the slot along the guides. Push the card until the positioning pin on its
handle touches the hole in the chassis. See ① in
Figure 6-2.
3) Press the ejector levers inward and seat the pin on the handle bar into the
positioning hole in the chassis. See ② in
Figure 6-2.
4) Fasten the captive screws to fix the card. See ③ in
Figure 6-2.
Note:
Put away the removed blank panel for future use.
6.3.2 Removing a Card
The procedure for removing a card is opposite to the installation procedure.
1) Wear an ESD-preventive wrist strap and loose the captive screws on the card
with a Philips screwdriver.
2) SHold the ejector levers on the card with both hands and pull them outward to
separate the connectors of the card from the backplane.
3) Gently slide the card along the guides out of the slot.