
Installation Guide for fl Modules 2007-02
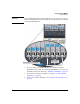

ProCurve Switch fl Modules
Installing Modules
5. Verify that network connections are working properly (see “Verifying
Cable Connections” on page 20).
6. Configure the ports on any newly installed interface module (see
“Customizing a Port Configuration” on page 24).
Installation ■ Avoid damage from static electricity. Static electricity can severely
Precautions
damage the electronic components on the modules. When handling and
installing the modules in your switch, follow these procedures to avoid
damage from static electricity:
• Use proper ESD grounding procedures before handling modules.
• Handle the module by its bulkhead or edges and avoid touching the
components and the circuitry on the board.
• When installing the module, equalize any static charge difference
between your body and the switch by wearing a grounding wrist strap
and attaching it to the switch’s metal body, or by frequently touching
the switch’s metal body.
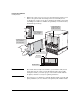
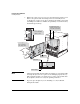
■ Ensure you fully insert the modules. Insert a module into its slot until
the bulkhead on the module is contacting or is very close to contacting
the front face of the switch chassis.
• Do not force a module into its slot. If a module does not seat
correctly, ease it back out and check alignment. Forcing a module can
damage it and the backplane.
• Check for alignment. Make sure that the metal plate of the module
- not the circuit board - is between the module guides. Check both the
upper and lower guides for proper alignment.
■ Secure the module. Once the module is fully inserted, make sure that
you fully close the ejector levers and screw in the two retaining screws to
secure the module in place.
■ For safe operation, proper switch cooling, and reduction of electromag-
netic emissions, ensure that a slot cover is installed on any unused module
slot. For safety, no more than one slot should be uncovered at a
time when the switch is powered on.
■ Do not install the modules in an environment where the operating ambient
temperature might exceed 40°C (104°F).
10