
Installation Guide for fl Modules 2007-02

ProCurve Switch fl Modules
Replacing or Removing a Module
Replacing or Removing a Module
Follow the procedures in this section to replace an installed module with a
new module, or to remove a module without replacing it. When installing a
new module, it is not necessary to reset the switch. However, some
configuration changes may be required for the module to be made operational.
See below for details.
Caution Be careful when you remove an interface module from the switch. It may be
very hot from normal operation. Also, be sure to follow all the installation
precautions described on page 10.
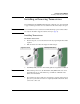
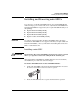
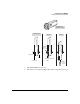
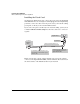
To remove or replace a module in the switch:
1. Remove network cables attached to the ports on the module.
2. Loosen the captive screws on each side of the module.
3. Unseat the module by pushing on the ejector levers on the top and bottom
of the module.
4. Carefully remove the module from its slot in the chassis.
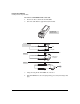
5. Do one of the following:
• If you install another module in the slot, go to “Installing Modules” on
page 8 and follow the relevant installation procedure for the type of
Switch fl module that you install.
• If you do not install another module and leave the slot empty, install
a blank slot cover over the empty slot.
Caution For proper cooling and reduction of electromagnetic emissions, make sure
that a slot cover is installed in any unused slot.
6. If you replace one type of interface module (for example, the 10-Port
100/1000-T Interface Module) with a different type of module (for
example, the 10-Port Mini-GBIC Interface Module) in the same slot, it is
not necessary to reset the switch. The port configuration settings are
automatically applied to the new module.
Note If the replacement module is both a different type and speed (for example,
you replace a 2-Port X2 10GbE Interface Module with a 10-Port Mini-GBIC
Interface Module), the new module will be inoperative until you recon-
figure the ports to recognize the new module type.
31