
3Com Switch 8800 Advanced Software V5 Configuration Guide

1106 CHAPTER 86: NQA CONFIGURATION
2 Configure the NQA client
Follow these steps to configure the NQA client for the UDP test:
Configuration example
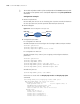
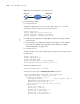
1 Network requirements
Use the NQA UDP-Private function to test the setup time for the UDP connection
between the local port (Switch 1) and the specified destination port (Switch 2).
The port number used is 8000.
Configure the UDP listening
function on the NQA server
nqa-server udpecho
ip-address port-number
Required
The listening IP address and
port number must be the
destination IP address and
port on the NQA client. If the
test type is UDP-Public, the
port number must be set to 7.
To do... Use the command... Remarks
To do... Use the command... Remarks
Enter system view system-view -
Enable the NQA client nqa-agent enable Required
Create an NQA test group
and enter its view
nqa admin-name
operation-tag
-
Set the test type to UDP test-type { udpprivate |
udppublic }
Required
Configure a destination
address for a test
destination-ip ip-address Required
The destination address must
be the listening IP address
configured on the NQA
server.
Configure a destination port destination-port
port-number
If the test type is UDP-Public,
no port needs to be
configured. If the test type is
UDP-Private, a port must be
configured and it must be the
listening port configured on
the NQA server.
Configure the size of test
packets sent
datasize size Optional
100 bytes by default.
Configure a string of fill
characters of a test packet
datafill text Optional
The string of fill characters of
a UDP packet is the string
corresponding with the ASCII
code 00 to FF by default.
Configure common optional
parameters
Refer to “Configuring
Optional Parameters for NQA
Tests” on page 1109
Optional
Enable the NQA test test-enable Required
View the test results display nqa results [
admin-name operation-tag ]
Required
You can execute the
command in any view.