
Installation and Getting Started Guide for 720wl/740wl/760wl 2004-03

Hardware Installation
Rack Mounting the Chassis
Each 700wl Series chassis comes with attached L-brackets suitable for mounting the chassis in a standard
19-inch (48.3 cm) equipment rack with two unobstructed outer posts. This unit is not suitable for
mounting in racks with obstructions (such as a power strip) that could impair access to the device. The air
space in front and rear of system should be 6.00 in. minimum.
Caution: Ground the chassis properly with the supplied power cord.
Caution: Be sure to position the power cord so that you can easily disconnect the chassis.
Caution: Do not install the chassis in an environment where the operating temperature might exceed
55
°
C (123
°
F).
Caution: Do not restrict air flow around the side and rear of the chassis. The air space in front and rear
of system should be 6.00 in. minimum.
Required Installation Tools
The following tools and equipment are required to install the chassis in a rack:
• Tape measure and level
• Number 2 Phillips screwdriver
Mounting Procedure
To install a chassis in a rack, follow these steps:
Step 1. Prepare for installation as follows:
a. Place the chassis on the floor or on a sturdy table, as close as possible to the rack. Leave
enough clearance to allow yourself to move around the chassis.
b. Use the tape measure to measure the depth of the rack. Measure from the outside of the front
mounting posts to the outside of the rear mounting strip. The depth must be at least 15.00
inches (38.1 cm).
c. Measure the space between the inner edges of the left front and right front mounting posts
to ensure that it is 17.75 inches (45.09 cm) wide. The chassis is 17.00 inches (43.2 cm) wide and
must fit between the mounting posts.
d. Open the accessories box and refer to the component checklist to verify that all parts are
included, as described in “Unpacking”.
Note: Some equipment racks have a power strip along the length of one of the rear posts. If the rack
has this feature, consider the position of the strip when planning fastener points.
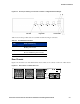
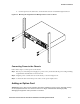
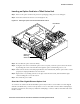
Step 2. Install the chassis in the rack as follows:
a. Align the mounting holes in the L-bracket with the mounting holes in the equipment rack.
b. Secure the chassis using either four 10-32 x 5/8 screws or four 12-24 x 5/8 screws (two per
side) through the elongated holes in the L-bracket and into the threaded holes in the
mounting post (
Figure 2-12).
2-10 HP ProCurve Secure Access 700wl Series Installation and Getting Started Guide