
Installation and Getting Started Guide for 720wl/740wl/760wl 2004-03


Hardware Installation
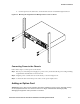
c.
Use the tape measure and level to ensure that the chassis is installed straight and level.
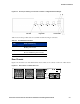
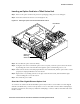
Figure 2-12. Mounting the Integrated Access Manager 760wl in a rack or cabinet
.
1
1
2
3
2
3
4
O
N
H
D
D
S
C
R
OL
L
S
EL
E
C
T
N
E
T
W
O
R
K
U
P
LIN
K
RE
S
ER
VE
D
hp
proc
urv
e
J8155A
int
egr
ated
a
ccess
manager
760 wl
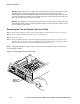
Connecting Power to the Chassis
Follow these steps to connect power to the chassis:
Step 1. Before you connect the power supply to a power source, ensure that all site power and grounding
requirements described above have been met.
Step 2. Plug the power cord into the rear of the chassis, as shown in Figure 2-11.
Step 3. Connect the other end of the power cord to an AC-power input source.
Adding an Option Card
Caution: Be sure to wear a wrist grounding strap when installing an option card or otherwise working
on the equipment with the cover removed. There is a danger of Electrostatic Discharge (ESD)
damaging the equipment if this precaution is not taken.
HP ProCurve Secure Access 700wl Series Installation and Getting Started Guide 2-11