
Installation and Getting Started Guide for 720wl/740wl/760wl 2004-03


P
PPG
GE
EFFRQQ
Basic Configuration
Creating a User Account in the Built-In Database
In order for a user to log in, the 700wl Series system must be able to authenticate the user through some
authentication service. The simplest form of authentication service is the built-in database included in the
700wl Series system Rights Manager. In this step, you add a user to the built-in database so you can logon
to your network as that user through the 700wl Series system.
Step 1. Point your browser to the IP address or hostname of your Access Control Server or Integrated
Access Manager, and log on to the Administrative Console.
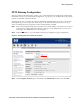
EFRQStep 2. From the initial page, click on the PG
GE
FRQ icon ( ) to go to the Rights Manager.
R
Step 3. The Rights Setup page appears.
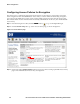
Step 4. Click the Identity Profiles tab at the top of the page.
The Identity Profiles page appears, showing a list of the currently-defined Identity Profiles.
Step 5. Click the Users link in the left panel of the page.
The Users page appears, with an empty Users list.
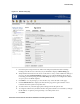
Step 6. Click the New User … button.
The New User page appears.
Step 7. Enter the following information:
•
Name: A descriptive name, such as “Demonstration User.” This is not the logon name.
•
Username/MAC Address: “demouser” (or any username you like). This is the logon name.
Do not check the MAC Address User check box.
•
Password: “password” (or any password you like)
Confirm Password: must be the same as that entered into the first password field.
Step 8. Click Save.
User Authentication Through the Default Logon Page
In this step, you connect your Windows PC to an Access Controller or Integrated Access Manager
downlink port and log onto your network using the username and password you added to the built-in
database. If this is successful, you should be able to access the Internet and other resources on your
network as normal.
Note: If you are using the same Windows PC as a client that you have been using for configuration,
and the PC‘s network interface is configured to use a static IP address, you must change its properties
so that it will obtain an IP address automatically using DHCP.
Step 1. Plug the Ethernet cable from your PC into one of Access Controller 720wl (or Integrated Access
Manager 760wl) downlink ports.
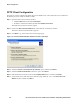
If you are using the same PC as both a client and a management station, you must release the
existing IP configuration (in Windows) from the network interface of the PC as follows:
From the Windows Start menu, click Run… then enter the command
ipconfig /release
Step 2. Power on the PC to obtain a new IP configuration from DHCP through the Access Controller
720wl, or do the following:
HP ProCurve Secure Access 700wl Series Installation and Getting Started Guide 4-3