
Installation and Reference Guide HP AdvanceStack 100Base-THub-12TX, Hub-12TXM, and Switch Modules 1997-06

HP Hub-12TX/Hub-12TXM Installation and Reference Guide
2-12 Installing the System
Powering on the Hub
1. Plug one end of the power cord into a power outlet, and the
other end into the power socket at the rear of the hub (in that
order for reasons of safety).
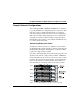
2. Check the LED indicator marked
Power on the front panel to
see if it is on.
3. The hub performs a self-diagnostic test upon power-on.
(Note that this test takes about 50 seconds to complete.) For
details about the system self-diagnostic test, refer to the
following section.
I
The unit supports a "hot swap" feature which permits you to
connect/disconnect Stacking Cables without powering off the hub
and without disrupting the operation of the hubs in the stack.
However, when changing Switch Port Modules, first disconnect
power to the concerned hub.
Diagnostic Tests
Upon power on, the system performs an internal self-diagnostic
test of major hub components. If any component fails during
the test, the hub will try to complete the diagnostic procedure.
Otherwise, the system will halt. For related information, refer
to
Diagnostic Test Indicators in Chapter 5.
Note: You can run system diagnostics at any time via the VT-100
console interface (by selecting
Reboot Hub
option). However, when
testing begins, the system leaves normal operation. If no problem is
encountered by diagnostics, the system automatically returns to normal
operation.