HP ProCurve Switches and Hubs HP ProCurve Switch Modules Installation Guide for the: HP 10/100Base-T Module HP 100Base-FX Module HP Gigabit-SX Module HP Gigabit-LX Module HP 100/1000Base-T Module HP 10Base-FL Module L e s s Wo r k , M o r e N e t w o r k http://www.hp.
2347.
2347.book Page ii Tuesday, May 9, 2000 12:53 PM © Copyright 1999, 2000 Hewlett-Packard Company All Rights Reserved Reproduction, adaptation, or translation without prior written permission is prohibited, except as allowed under the copyright laws.
2347.book Page iii Tuesday, May 9, 2000 12:53 PM Contents Descriptions . . . . . . . . . . . . . . . . . . . . . . . . . . . . . . . . . . . . . . . . . . . . . . . . . . . 1 Installing the Module . . . . . . . . . . . . . . . . . . . . . . . . . . . . . . . . . . . . . . . . . . . 3 Overview . . . . . . . . . . . . . . . . . . . . . . . . . . . . . . . . . . . . . . . . . . . . . . . . . . . . 3 Downloading Switch Software . . . . . . . . . . . . . . . . . . . . . . . . . . . . . . . . .
2347.
2347.book Page 1 Tuesday, May 9, 2000 12:53 PM Descriptions HP ProCurve Switch Modules For the HP ProCurve Switches 1600M, 2424M, 4000M, and 8000M Descriptions The HP ProCurve Switch Modules are components that you can add to an HP ProCurve switch to provide a variety of network connectivity options.
2347.book Page 2 Tuesday, May 9, 2000 12:53 PM Descriptions Contact your HP-authorized networking products reseller or your HP representative for information on availability of other modules. You can also visit the HP networking products Web site at http://www.hp.com/go/procurve to get more information.
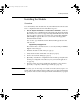
2347.book Page 3 Tuesday, May 9, 2000 12:53 PM Installing the Module Installing the Module Overview You can install any of the modules into any of the HP ProCurve switches that have a compatible module slot. The installation steps are: 1. For the Gigabit-LX Module or 100/1000Base-T Module, download the new OS code to your HP ProCurve switch. The switch must be running OS version C.05.06 or later to support the Gigabit-LX Module and version C.07.
2347.book Page 4 Tuesday, May 9, 2000 12:53 PM Installing the Module Downloading Switch Software Verifying Current Switch Software Most of the HP ProCurve Switch Modules are supported by all versions of the switch operating system (OS). For two of the modules, your HP ProCurve Switch must be running specific OS versions: ■ Gigabit-LX Module (HP J4114A) - OS version C.05.06 or later ■ 100/1000Base-T Module (HP J4115B) - OS version C.07.
2347.book Page 5 Tuesday, May 9, 2000 12:53 PM Installing the Module Downloading the New OS This procedure describes how to use a personal computer (PC) to download the OS. If you are using a UNIX workstation, refer to the Note at the bottom of this page. 1. 2.
2347.book Page 6 Tuesday, May 9, 2000 12:53 PM Installing the Module Installing the Module in an Unused Slot Installation Precautions: ■ Static electricity can severely damage the electronic components on the modules. When handling and installing the modules in your switch, follow these procedures to avoid damage from static electricity: • Handle the module by its bulkhead or edges and avoid touching the components and the circuitry on the board.
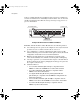
2347.book Page 7 Tuesday, May 9, 2000 12:53 PM Installing the Module slot guides Installing the module in a horizontal slot RFI fingers slot identification window Note: Use some caution when installing modules. Excessive installation force could cause the RFI fingers on the switch or adjacent module or bulkhead to be dislodged. Please see the “Installation Precautions” on the previous page.
2347.book Page 8 Tuesday, May 9, 2000 12:53 PM Installing the Module 4. Verify the module is installed correctly. Observe the Module Status LED for the slot in which the module is being installed, and the Self Test and Fault LEDs on the switch to verify that the module is installed properly.
2347.book Page 9 Tuesday, May 9, 2000 12:53 PM Installing the Module 5. Tighten the two retaining screws with a flat-blade or Torx T-10 screwdriver to secure the module in the slot. Be careful not to overtighten the screws. tighten these two screws 6. Note Connect the appropriate network cables to the module's ports as shown in the table on the next two pages. The table shows the supported cable types for each of the modules. For more information on the cable specifications, see “Cables” on page 22.
2347.
2347.book Page 11 Tuesday, May 9, 2000 12:53 PM Installing the Module Module Cable Type Gigabit-LX Module single mode or multimode fiber-optic cable with SC connectors 100/1000Base-T Module RJ-45 port with “Auto MDI/MDI-X” UTP cable with RJ-45 connector Maximum Length single mode fiber-optic cables that are fitted with SC connectors 5 kilometers 62.
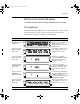
2347.book Page 12 Tuesday, May 9, 2000 12:53 PM Installing the Module 7. Check the port LEDs for the newly-installed module to ensure that the port(s) connected in the preceding step are operating correctly. Each port on the switch modules has Link and Mode LEDs near it as shown in the next illustration. Example Link and Mode LEDs Link and Mode LEDs • The Link LED will be lit for each port that is connected properly to an active network device.
2347.book Page 13 Tuesday, May 9, 2000 12:53 PM Installing the Module Mode Conditioning Patch Cord for Gigabit-LX The following information applies to installations in which multimode fiber-optic cables are connected to a Gigabit-LX Module installed in the switch. Unlike Gigabit-SX, which connects to only multimode fiber-optic cabling, Gigabit-LX can use either single mode or multimode cable.
2347.book Page 14 Tuesday, May 9, 2000 12:53 PM Installing the Module Installing the Patch Cord As shown in the illustration below, connect the patch cord to the Gigabit-LX Module with the section of single mode fiber plugged in to the Tx (transmit) port. Then, connect the other end of the patch cord to your network cabling patch panel, or directly to the network multimode fiber.
2347.book Page 15 Tuesday, May 9, 2000 12:53 PM Customizing the Port Configuration Customizing the Port Configuration If the slot in which you installed the module was empty the last time the switch was either rebooted or reset (or the power to the switch was cycled), then the module will use preconfigured default parameter values that will work for most networks.
2347.book Page 16 Tuesday, May 9, 2000 12:53 PM Replacing or Removing a Module Replacing or Removing a Module Follow these procedures to replace one module with another, or to remove a module without replacing it: 1. Make sure the switch is running an OS version that supports the module. See page 4 for more information. 2. Remove any network cables from the ports on the module. 3.
47.book Page 17 Tuesday, May 9, 2000 12:53 PM Resetting the Switch Resetting the Switch Reasons for Resetting the Switch Generally, you only need to reset the switch when it needs to recognize a change in its hardware or software (console) configuration.
2347.book Page 18 Tuesday, May 9, 2000 12:53 PM Troubleshooting Troubleshooting The primary tools for troubleshooting the switch modules are the LEDs on the front of the switch and on the modules. Refer to “LED Behavior” on page 8. Also, refer to the Installation Guide and the Management and Configuration Guide shipped with the switch, for more detailed troubleshooting information.
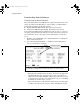
2347.book Page 19 Tuesday, May 9, 2000 12:53 PM Troubleshooting Tip Number Problem Solution ➋ A module was installed in the slot that is a different type than the previously installed module, and the switch has not yet been reset. When you “hot swap” modules in the switch slot, if you install a different module type than the one that was previously installed in the slot, you must reset the switch so the switch processor can properly initialize and configure the new module type.
2347.book Page 20 Tuesday, May 9, 2000 12:53 PM Customer Support Services Customer Support Services If you are having any trouble with your module or switch, Hewlett-Packard offers support 24 hours a day, seven days a week through the use of a number of automated electronic services. See the Customer Support/Warranty booklet that came with your switch for information on how to use these services to get technical support. The HP networking products World Wide Web site, http://www.hp.
2347.book Page 21 Tuesday, May 9, 2000 12:53 PM Specifications Specifications Environmental Operating Non-Operating Temperature: 0C to 55C (32F to 131F) -40C to 70C (-40F to 158F) Relative humidity: (non-condensing) 15% to 95% at 40C (104F) 15% to 90% at 65C (149F) Maximum altitude: 4.6 Km (15,000 ft) 4.6 Km (15,000 ft) Lasers The Gigabit-SX and Gigabit-LX Modules are Class 1 Laser Products. Laser Klasse 1 These modules comply with IEC 825-2: 1993.
2347.book Page 22 Tuesday, May 9, 2000 12:53 PM Specifications Cables Twisted-Pair 10 Mbps Operation Category 3, 4, or 5 100-ohm unshielded twisted-pair (UTP) cable, complying with IEEE 802.3 Type 10Base-T specifications, fitted with RJ-45 connectors 100 Mbps Operation Category 5 100-ohm unshielded twisted-pair (UTP) or shielded twisted-pair (STP) cable, complying with IEEE 802.
2347.book Page 23 Tuesday, May 9, 2000 12:53 PM Specifications Fiber-Optic 10Base-FL 62.5/125 ←m or 50/125 ←m (core/cladding) diameter, gradedindex, multimode fiber-optic cables, complying with the ITU-T G.651 and ISO/IEC 793-2 Type A1b or A1a respectively, fitted with ST connectors 100Base-FX 62.5/125 ←m or 50/125 ←m (core/cladding) diameter, gradedindex, multimode fiber-optic cables, complying with the ITU-T G.
2347.book Page 24 Tuesday, May 9, 2000 12:53 PM EMC Regulatory Statements EMC Regulatory Statements U.S.A. FCC Class A This equipment has been tested and found to comply with the limits for a Class A digital device, pursuant to Part 15 of the FCC Rules. These limits are designed to provide reasonable protection against interference when the equipment is operated in a commercial environment.
2347.book Page 25 Tuesday, May 9, 2000 12:53 PM EMC Regulatory Statements Korea Taiwan European Community Declaration of Conformity This product is designed for operation with the HP ProCurve switches that have module slots. Please see the Declarations of Conformity included in the Installation Guides for those products.
2347.book Page 26 Tuesday, May 9, 2000 12:53 PM H Technical information in this document is subject to change without notice. Copyright Hewlett-Packard Company 1999, 2000. All rights reserved. Reproduction, adaptation, or translation without prior written permission is prohibited except as allowed under the copyright laws.