
ProCurve Switch xl Modules Installation Guide 2004-05


5
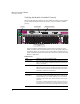
HP ProCurve Switch xl Modules
Installing the Modules
Installing the Modules
Overview
You can install any of the modules into any of the HP ProCurve xl Switches that have
a compatible module slot. As of this printing, those are the
HP ProCurve Series 5300xl Switches:
■ 5308xl (p/n J4819A)
■ 5372xl (p/n J4848B)
■ 5348xl (p/n J4849B)
■ 5304xl (p/n J4850A)
“Hot Swap”
Notes
The mini-GBICs can be “hot swapped”. That is, they can be installed or removed
after the mini-GBIC xl Module is installed in the switch and the module is receiving
power. For more information, see page 8.
If necessary, you can “hot-swap” one module for another; that is, replace one module
with another while the switch is still powered on, without interrupting the operation
of the rest of the switch ports. For more information,
see page 21.
You can install the modules into the switch either with the switch powered on or off.
The following procedures assume the switch is powered on.
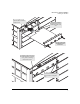
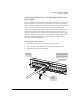
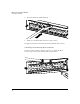
1. Install the modules in a switch slot (see page 6).
If you have installed any modules into slots that were previously occupied by a
different type module, you need to reset the switch (see page 22).
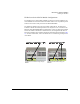
2. If you are using the mini-GBIC xl Module, install the mini-GBICs in the module.
You can install the mini-GBICs before or after installing that module into the
switch (see page 8).
3. Optionally, connect an HP ProCurve 600 Redundant and External Power Supply
to the xl PoE EPS input, using the supplied EPS cable (see page 9).
4. Verify the modules are installed correctly (see page 14).
5. Connect the network cabling (see page 15).
6. Verify the network connections are working properly (see page 18).
7. Optionally, customize the configuration for the modules’ ports (unless the
default port configuration is satisfactory for your network application - see page
19).