
ProCurve Switch xl Modules Installation Guide 2004-05


21
HP ProCurve Switch xl Modules
Replacing or Removing a Module
Replacing or Removing a Module
Follow these procedures to replace one module with another, or to remove a module
without replacing it:
1. Remove any network cables from the ports on the module.
(If this is a PoE xl Module, also remove the PoE cable.)
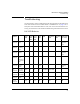
2. On the module you want to remove from the switch, unscrew the retaining screws
enough to disconnect them from the threaded holes in the switch.
3. Grab the screws and pull the module out from the slot. It may help to brace your
hands against the face of the switch and “lever” the module out from the switch
slot.
4. Do one of the following:
• If you will be installing another module in the slot, go to “Installing the
Module in an Unused Slot” on page 6 and begin with step 2.
• If you will not install another module in the slot (that is, leave it empty),
then re-install a slot cover plate over the empty slot opening.
Caution For proper cooling and reduction of electromagnetic emissions, ensure a slot cover
is installed on any unused slot.
5. Reset the switch, as described under “Resetting the Switch” on page 22, if you
are exchanging one type of module with a different type of module in the same
slot (for example, replacing a 10/100-TX xl Module with a
100/1000-T xl Module).
If you are replacing a module with another one of the same type in the same slot,
it is not necessary to reset the switch. The current configuration for ports in that
slot will apply to the new module.
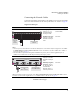
hp procurve
10
/
100 -TX
xl module
J4820A
xl
module
unscrew the retaining screws