3Com® Switch 5500G Open Services Networking Configuration and Command Reference Guide www.3Com.
3Com Corporation 350 Campus Drive Marlborough, MA 01752-3064 Copyright © 2007-2008, 3Com Corporation. All rights reserved. No part of this documentation may be reproduced in any form or by any means or used to make any derivative work (such as translation, transformation, or adaptation) without written permission from 3Com Corporation.
Contents Introduction Get the latest documentation and software for your 3Com OSN|M About this guide 5 1 Configuring the OSN|M OSN|M Overview 7 Switching to the OSN|M’s Operating Interface Restarting the OSN|M’s Linux OS 8 2 7 Configuring the Application Control Forwarding Protocol (ACFP) Introduction to ACFP 9 Configuring ACFP 15 Displaying ACFP 16 ACFP Configuration Example 3 16 Configuring an Application Control System Exchange Interface Introduction to ACSEI 21 Configuring an ACSEI Server on a
display acfp policy-info 35 display acfp rule-info 36 display acfp server-info 38 snmp-agent trap enable 39 6 ACSEI Server Configuration Commands acsei client close 41 acsei client reboot 41 acsei server 42 acsei server enable 42 acsei timer clock-sync 43 acsei timer monitor 44 display acsei client info 44 display acsei client summary 7 46 ACSEI Client Configuration Commands on the OSN|M acsei-client debug disable 47 acsei-client debug enable 47 acsei-client debug show 48 chkconfig acseid off 49 chkcon
Introduction Get the latest documentation and software for your 3Com OSN|M Thank you for purchasing the 3Com® OSN|M Open Services Networking Module. As part of our commitment to help you get the most out of your 3Com network equipment, we offer updated documentation and software on our web site. To obtain the most up-to-date user documentation and operating software for the 3Com OSN|M, point your web browser to: www.3Com.com and select the “Support and Registration” link.
Introduction
1 Configuring the OSN|M OSN|M Overview You can use the Open Services Networking Module (OSN|M) as an expansion module installed in an expansion module slot on the rear panel of a Switch 5500G. The OSN|M runs the Linux operating system (Linux OS) with which you can load software such as security and voice software as needed. You can log into the OSN|M’s Linux system through: ■ The OSN|M’s console port. ■ The OSN|M’s management Ethernet port using SSH.
Chapter 1: Configuring the OSN|M Restarting the OSN|M’s Linux OS After you log into a switch, you can restart the OSN|M’s Linux OS of the local switch or another switch in the same fabric if you need to troubleshoot that system. An OSN|M has an independent CPU. Therefore, restarting the Linux OS does not affect the status of the switch. That is, the OSN|M and the switch can restart independently. Restarting the Linux OS on the OSN|M will not result in restarting the switch.
2 Configuring the Application Control Forwarding Protocol (ACFP) Introduction to ACFP Basic data communication networks are composed of routers and switches, which forward data packets. With the development of data networks, more and more services run on the networks. It has become difficult to use traditional network devices (routers and switches) to handle all the services. Therefore, some products are designed to handle specific services.
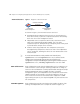
Chapter 2: Configuring the Application Control Forwarding Protocol (ACFP) ACFP Architecture Figure 1 Diagram for ACFP architecture Interface-connecting component Independent service component Routing/switching component As shown in Figure 1, the ACFP architecture consists of: n ■ Routing/switching component (ACFP server): As the main part of a router and a switch, it performs complete router/switch functionality and is the core of user management control.
Introduction to ACFP 11 control the traffic on the ACFP server (namely, the routing/switching component shown in Figure 1), by implementing the following functions: ■ Mirroring and redirecting the traffic on the ACFP server to the ACFP client ■ Permitting or denying the traffic from the ACFP server ■ Carrying the context ID in a packet to enable the ACFP server and ACFP client to communicate the packet context with each other.
Chapter 2: Configuring the Application Control Forwarding Protocol (ACFP) ACFP server information is generated by the ACFP server itself. ACFP client information, ACFP collaboration policy, and ACFP collaboration rules are generated on the ACFP server after being sent by the ACFP client through the collaboration MIB or collaboration protocol.
Introduction to ACFP 13 ■ OS-Info: System name and version number of the ACFP client. ■ App-Info: Application software type and version number of the ACFP client. ■ Client IP: ACFP client IP address. ■ Client Mode: Working mode currently supported by the ACFP client; namely, the combination of the host, pass-through, mirroring, and redirect modes. ACFP collaboration policy ACFP collaboration policy refers to the collaboration policy that the ACFP client sends to the ACFP server for application.
Chapter 2: Configuring the Application Control Forwarding Protocol (ACFP) ACFP collaboration rules ACFP collaboration rules refer to the rules that the ACFP client sends to the ACFP server for an application. There are two types of collaboration rules: ■ Monitoring rules, which monitor, analyze, and process the packets to be sent to the ACFP client. The action types corresponding to monitoring rules are redirect, mirror and rate. ■ Filtering rules, which determine the packets to deny and permit.
Configuring ACFP 15 ■ Inverse mask of destination IP address ■ Destination port number operator: Its type can be equal to, not equal to, greater than, less than, greater than and less than. The following ending destination port number is meaning only when the type is greater than and less than. The destination port number of the packets matched by the identifier must be greater than the starting destination port number and less than the ending destination port number.
Chapter 2: Configuring the Application Control Forwarding Protocol (ACFP) To... Use the command... Remarks Enable ACFP acfp enable Required Disabled by default Enable ACFP traps snmp-agent trap enable acfp Optional [ client | policy | rule | server ] Allowed by default To... Use the command...
ACFP Configuration Example 17 Network Diagram ■ The IP address of Host A is 192.168.1.1/24, and that of Host B is 192.168.2.1/24. They are connected to the switch through GigabitEthernet 1/0/1. ■ The IP address of Host C is 192.168.3.1/24, and that of Host D is 192.168.3.2/24. They are connected to the switch through GigabitEthernet 1/0/2. ■ The OSN|M (ACFP client) is installed in the expansion module slot on the switch’s rear panel.
Chapter 2: Configuring the Application Control Forwarding Protocol (ACFP) Configure the ACFP client through a MIB browser to send information to the Switch, where the client index is 1, three working modes are supported; host, redirect, and mirror (achieved by setting node h3cAcfpClientMode), the client row status is 4 (achieved by setting node h3cAcfpClientRowStatus) and the other parameters adopt the default values.
ACFP Configuration Example 19 in network segment 192.168.2.0 (achieved by setting node h3cAcfpRuleSrcIP) and source IP wildcard-mask is 0.0.0.255 (achieved by setting node h3cAcfpRuleSrcIPMask) are matched, the rule row status is 4 (achieved by setting node h3cAcfpRuleRowStatus) and the other parameters adopt the default values. # Apply ACFP rules Configure the ACFP policy through the MIB browser, where the policy index is 1.1.
Chapter 2: Configuring the Application Control Forwarding Protocol (ACFP)
3 Configuring an Application Control System Exchange Interface Introduction to ACSEI As a private protocol, an Application Control System Exchange Interface (ACSEI) provides a method for exchanging information between Application Control Forwarding Protocol (ACFP) clients and the ACFP server. It supports ACFP collaboration, ensuring valid information interaction between the ACFP clients and the ACFP server, so that the ACFP server and clients can cooperate to run a service.
Chapter 3: Configuring an Application Control System Exchange Interface ■ Mutual monitoring and between an ACSEI client and the ACSEI server. ■ Allow information interaction between the ACSEI server and ACSEI clients, including clock synchronization. ■ Control the ACSEI clients on the ACSEI server. For example, you can close or restart an ACSEI client on the ACSEI server. An ACSEI server can register multiple ACSEI clients.
Configuring an ACSEI Server on a Switch 23 6 Configuring an ACSEI Server on a Switch Enabling an ACSEI Server If detecting the disconnection of the ACSEI client, the ACFP server will remove the configuration and policies associated with the client.
Chapter 3: Configuring an Application Control System Exchange Interface Closing an ACSEI Client c Restarting an ACSEI Client To... Use the command... Remarks Enter ACSEI server view acsei server - Configure the monitoring timer for ACSEI server to monitor ACSEI client acsei timer monitor seconds Optional Follow these steps to close an ACSEI client: To... Use the command...
ACSEI Client Configuration on Linux System 25 Displaying and Maintaining an ACSEI Server To... Use the command... Remarks Display ACSEI client summary display acsei client summary [ client-id ] Available in any view Display ACSEI client information display acsei client info [ client-id ] ACSEI Client Configuration on Linux System You can log into the Linux system on an OSN|M in multiple ways.
Chapter 3: Configuring an Application Control System Exchange Interface Configuring the Default Startup Settings for an ACSEI Client ■ For a description of the osm connect unit command, refer to “osm connect unit” on page 31. ■ The above rpm commands are Linux operating system commands and not covered in this document. The ACSEI client is enabled once it is installed, and by default, after the Linux system starts up, it starts up the ACSEI client automatically.
ACSEI Client Configuration on Linux System 27 Figure 4 Setup interface for the ACSEI client default startup 3 Select System services, press Enter. The Services screen is displayed as shown in Figure 5. Figure 5 Service interface for an ACSEI client default startup 4 Move the cursor to acseid, and use the Space key to choose that option.
Chapter 3: Configuring an Application Control System Exchange Interface ■ [ * ] specifies that the Linux system automatically starts up ACSEI client when started up. ■ [ ] specifies that the Linux system does not start up ACSEI client when started up. 5 Check your choice, use the Tab key to move the cursor to OK, press Enter. You return to the previous view. 6 Select Quit to exit the Setup interface. Controlling ACSEI Client Follow these steps to control ACSEI client: To... Use the command...
ACSEI Client Configuration on Linux System 29 Displaying and Maintaining ACSEI Client on OSN|M To... Use the command... Remarks Switch to the OSN|M’s Linux system from the switch’s CLI osm connect unit unit-id Required Available in user view; After the operation, the operating interface is switched to the Linux system interface where you can execute the following commands.
Chapter 3: Configuring an Application Control System Exchange Interface
4 OSN|M Configuration Commands osm connect unit Syntax View osm connect unit unit-id User view Parameters unit unit-id: Specifies a switch by its unit ID. Description Use the osm connect unit command to switch from the command line interface on the local switch to the Linux OS on the OSN|M. You can specify the unit ID of the local switch or the unit ID of another switch in the same fabric as the local switch.
Chapter 4: OSN|M Configuration Commands osm reboot unit Syntax View osm reboot unit unit-id User view Parameters unit unit-id: Specifies a switch by its unit ID. Description Use the osm reboot unit command to restart the OSN|M’s Linux OS on the specified switch. You can specify the unit ID of the local switch or the unit ID of another switch in the same fabric as the local switch.
5 ACFP Configuration Commands acfp enable Syntax acfp enable undo acfp enable View System view Parameters None Description Use the acfp enable command to enable ACFP. Use the undo acfp enable command to disable ACFP. By default, ACFP is disabled. Examples # Enable ACFP. system-view System View: return to User View with Ctrl+Z.
Chapter 5: ACFP Configuration Commands Description n Examples Use the display acfp client-info command to display the information about the specified ACFP client(s). ■ If the ACFP client ID is specified, the information about the specified ACFP client is displayed. ■ If no ACFP client ID is specified, the information about all the ACFP clients is displayed. # Display the information about all the ACFP clients.
display acfp policy-info Syntax View Parameters display acfp policy-info [ client client-id [ policy-index ] | dest-interface interface-type interface-number | in-interface interface-type interface-number ] [ active | inactive ] Any view client client-id: Displays the policy sent by the specified ACFP client, where client-id is the ACFP client ID, in the range of 1 to 2147483647. policy-index: Policy index, in the range of 1 to 2147483647.
Chapter 5: ACFP Configuration Commands Examples # Display information about all the active policies that specify the packet inbound port as GigabitEthernet 1/0/1.
Parameters in-interface: Displays ACFP rule information in order of inbound port. The ACFP rule which does not include the inbound port is not displayed. policy: Displays the ACFP rule information in order of policy. client-id: ACFP client ID, in the range of 1 to 2147483647. policy-index: Policy index, in the range of 1 to 2147483647. Description n Examples Use the display acfp rule-info command to display ACFP rule information.
Chapter 5: ACFP Configuration Commands Table 3 Description of the display acfp rule-info command fields Field Description ACFP rule total number Total number of ACFP rules ClientID Client list index Policy-Index Policy index Rule-Index Rule index SIP Source IP address SMask Inverse mask of source IP address Action Either: Status ■ permit: permit packets ■ deny: deny packets ■ mirror: mirror packets ■ redirect: redirect packets ■ rate: limit packet rate Rule status: active or i
Table 4 Description of the display acfp server-info command fields Field Description Server-Info ACFP client working mode supported by the ACFP server: ■ ipserver: host mode ■ redirect: redirect mode ■ mirror: mirror mode Max Life-Time Maximum expiration time (in seconds) of the collaboration policy supported by the server PersistentRules Whether the server supports permanent collaboration rules ContextType switch-context: The packet carrying the context ID is applicable on a switch.
Chapter 5: ACFP Configuration Commands Examples # Enable the switch to send all ACFP traps. system-view System View: return to User View with Ctrl+Z.
6 ACSEI Server Configuration Commands acsei client close Syntax View acsei client close client-id ACSEI server view Parameters client-id: ID of the ACSEI client to be closed, in the range of 1 to 7. (An ACSEI client ID is assigned by the ACSEI server.) Description Use the acsei client close command to close the specified ACSEI client. n Examples After you close an ACSEI client using the acsei client close command, the OSN|M where the ACSEI client is integrated is shut down. # Close ACSEI client 1.
Chapter 6: ACSEI Server Configuration Commands Description Use the acsei client reboot command to restart the specified ACSEI client. Note that after you restart an ACSEI client using the acsei client reboot command, the OSN|M where the ACSEI client is integrated is restarted. Examples # Restart ACSEI client 1. system-view System View: return to User View with Ctrl+Z.
Description Use the acsei server enable command to enable the ACSEI server. Use the undo acsei server enable command to disable the ACSEI server. By default, the ACSEI server is disabled. Examples # Enable ACSEI server. system-view System View: return to User View with Ctrl+Z.
Chapter 6: ACSEI Server Configuration Commands acsei timer monitor Syntax acsei timer monitor seconds undo acsei timer monitor View ACSEI server view Parameters seconds: Value of the monitoring timer that is used by the ACSEI server to monitor the ACSEI clients. It ranges from 0 to 10 (in seconds), where 0 disables the ACSEI server from monitoring the ACSEI client. Description Use the acsei timer monitor command to set the monitoring timer for the ACSEI server to monitor the ACSEI client.
n Examples ■ The client information is retrieved from the advertisement packet sent by the client, so that when there is no ACSEI client information, the command displays the information keywords only. ■ If executed without the client-id argument, the command displays information about all the ACSEI clients in order of registration time. # Display information about ACSEI client 1.
Chapter 6: ACSEI Server Configuration Commands display acsei client summary Syntax View display acsei client summary [ client-id ] Any view Parameters client-id: ID of an ACSEI client whose summary is to be displayed. This argument ranges from 1 to 7. Description Use the display acsei client summary command to display ACSEI client summary information. n Examples ■ Summary information of multiple ACSEI clients is displayed in order of registration time.
7 ACSEI Client Configuration Commands on the OSN|M n You can execute the following commands in any directory of the Linux system. You can use the osm connect unit command in the switch’s user view to enter the OSN|M’s Linux system. For description of the osm connect unit command, refer to “osm connect unit” on page 31.
Chapter 7: ACSEI Client Configuration Commands on the OSN|M Parameters None Description Use the acsei-client debug enable command to enable debugging for the ACSEI client. By default, debugging for the ACSEI client is disabled. Examples # Enable debugging for the ACSEI client on unit 1.
chkconfig acseid off Syntax View chkconfig acseid off Any directory of the Linux system Parameters None Description Use the chkconfig acseid off command to prevent the ACSEI client from automatically starting with the Linux system startup. By default, the ACSEI client starts up automatically when the Linux system starts. Examples # Configure the ACSEI client not to start up on unit 1 when the Linux system is started.
Chapter 7: ACSEI Client Configuration Commands on the OSN|M osm connect unit 1 Connected to OSM! [root@localhost ~]# chkconfig acseid on service acseid condrestart Syntax View service acseid condrestart Any Linux system directory Parameters None Description Use the service acseid condrestart command to restart the ACSEI client conditionally.
[root@localhost ~]# service acseid status acseic-daemon is stopped service acseid reload Syntax View service acseid reload Any Linux system directory Parameters None Description Use the service acseid reload command to load the ACSEI client configuration file. Note that you can load the ACSEI client configuration file only when the ACSEI client is running. Otherwise, you will fail to load the ACSEI client configuration file. Examples # Load the ACSEI client configuration file on unit 1.
Chapter 7: ACSEI Client Configuration Commands on the OSN|M n Examples Regardless if the ACSEI client is running or not, the system first stops the ACSEI client and then starts it after you execute this command. # Restart the ACSEI client on unit 1 (when the ACSEI client is running). osm connect unit 1 Connected to OSM! [root@localhost ~]# service acseid status acseic-daemon (pid 2335) is running...
# Start the ACSEI client on unit 1 when the ACSEI client is stopped. osm connect unit 1 Connected to OSM! [root@localhost ~]# service acseid start Starting acseic-daemon: [ OK ] service acseid status Syntax View service acseid status Any Linux system directory Parameters None Description Use the service acseid status command to query the running status of an ACSEI client. Examples # View the running status of the ACSEI client on unit 1.
Chapter 7: ACSEI Client Configuration Commands on the OSN|M Examples # Stop the ACSEI client on unit 1. osm connect unit 1 Connected to OSM! [root@localhost ~]# service acseid status acseic-daemon (pid 2335) is running...