
Advanced Services v2 zl Module Quickstart Guide


HP Advanced Services v2 zl Module Quickstart 3 Install VMware vSphere
2. On the computer, configure a serial terminal program in VT100 mode,
with Baud rate 9600, 8 data bits, no parity, 1 stop bit, and no flow control.
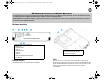
3. Open a terminal session with the switch and press Enter several times
until the welcome screen appears. (A different screen may appear if
another session was already open.)
4. Press any key to continue. The switch
Command Line (CLI)
prompt
appears.
Note:
If the switch menu appears instead, return to the top-level menu,
and select
Command Line (CLI)
.
Verify the switch software version
Before configuring the module, verify that the switch software version is at
least version K.15.14.xxx
1. At the switch CLI prompt, enter:
show version
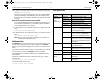
2. The software information is displayed:
image stamp: ...
<date, time>
K.15.14.XXX
If necessary, update the switch software according to the directions in your
switch documentation.
(Optional) Define and assign VLANs
By default all the module ports are configured to the default VLAN in the
switch. Based on your requirements, you can configure additional VLANs and
assign the Advanced Services v2 zl Module physical ports to the specific
VLANs. For more information, see Installation and Getting Started Guide.
Install VMware vSphere
You can install the VMware vSphere from a CD, DVD, USB Flash, or through
Preboot Execution Environment (PXE). For more information about the
installation options, see VMware vSphere Installation and Setup Guide.
Boot from a CD/DVD
1. Download the VMware vSphere 5.5 ISO image from VMware website.
2. Create a bootable CD/DVD from the ISO image.
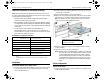
3. Insert the USB CD/DVD drive into the module’s USB port.
4. Insert the ISO image CD or the DVD in the CD/DVD drive.
5. At the CLI prompt, enter:
services <slot-id> boot usb
The following message is displayed at the CLI prompt:
Services <slot-id> will be rebooted, do you want to
continue [y/n]?
6. Enter y
7. To switch to the module serial console from the switch CLI prompt, enter:
services
<slot-id> serial
The module boots from the CD/DVD image installed in the CD/DVD drive.
You can now install VMware vSphere 5.5 ISO image on the Advanced
Services v2 zl Module. Follow the instructions from the VMware’s
Installation and Setup Guide to install the image.
Boot from a USB flash drive
1. Download the VMware vSphere 5.5 ISO image from VMware website.
2. Edit the BOOT.CFG file to include the following line to enable serial
console redirection in the vSphere kernel:
Kernelopt=runweasel gdbPort=none logPort=none
com1_baud=9600 tty2Port=com1
3. (Optional) Enable persistent serial console. To enable persistent serial
console, configure the firstboot kernel options for the vSphere and edit
the ks.cfg file to include the following lines:
%firstboot --interpreter=busybox
esxcfg-advcfg -k none gdbPort
esxcfg-advcfg -k none logPort
esxcfg-advcfg -k 9600 com1_baud
esxcfg-advcfg -k com1 tty2Port
reboot
4. Use UNetbootin utility to create a bootable USB flash drive from the ISO
image.
5. Insert the USB flash drive into the module’s USB port.
6. At the CLI prompt, enter:
services <slot-id> boot usb
The following message is displayed at the CLI prompt:
Services <slot-id> will be rebooted, do you want to
continue [y/n]?
7. Enter y
5998-4959_QS_Advanced_Services_v2_zl_Controller.fm Page 3 Wednesday, December 4, 2013 4:26 PM