
Avaya Aura Session Border Controller powered by Acme Packet Installation and Getting Started Guide 2010-09


2-9
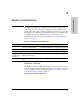
Hardware Installation
Install the HP Extended Services zl Module
time across a network helps to ensure proper coordination and operation
among all network components. Setting the time accurately also ensures that
event logs use the correct time, allowing you to monitor or troubleshoot
problems more easily.
The Avaya Aura™ Session Border Controller Application initially gets the time
from the System Platform Local Clock, which receives the current time from
the HP zl switch. While not mandatory, if you use an NTP server in your
network, HP recommends starting ntpd on the System Platform (Server
Management > Date / Time Configuration) and obtaining the application time
from there.
IMPORTANT Starting ntpd restarts the module. You may start ntpd and configure the time
before, or just after, you install the application.
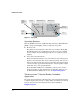
Install the HP Extended Services zl
Module
Installation Precautions
■ Static electricity can severely damage the electronic components on the
module. When handling and installing the module, follow these proce-
dures to avoid damage from static electricity:
• Handle the module by its bulkhead or edges and avoid touching the
components and the circuitry on the board.
• When installing the module, equalize any static charge difference
between your body and the switch by wearing a grounding wrist
strap and attaching it to the switch’s metal body, or by frequently
touching the switch’s metal body.
■ The module has “low-force,” high-performance connectors. High inser-
tion forces are not necessary to install the module, and should not be
used.
■ Ensure the module is fully inserted. Press the module into the slot
until the bulkhead on the module contacts or is very close to contacting
the front face of the switch chassis.
■ Once the module is fully inserted, screw in the four retaining screws to
secure the module in place.