
Getting Started Guide 2007-07


24
Loading New Module Software
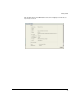
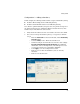
3. The next step is to add the IP address of the redundant member. Select
the screen Network Setup > Redundancy Group> Member. Select Add and
a pop-up screen appears. Enter the IP address of the new Group member
(J9052A). Select OK to return to the main screen.
4. Next, repeat these steps with the J9052A module, using its IP address for
the Interface IP, and the IP address of the J9051A module as the Member.
Typically, the J9052A module is operated in the Standby mode (which is
the default mode).
5. Select Network Setup > Redundancy Group > Configuration. Check the
box for Enable Redundancy, and select the Apply button to save the setting
for this session. Note that the Redundancy status is ’Online’ and the Group
Connectivity Status is ’All Members connected’. The screen may need to
be refreshed to get the current status, as the Redundancy Group formation
takes a few moments.
6. Select Save to save the settings in a non-volatile memory in the Module.
Repeat this step for both modules.
The two modules, J9051A and J9052A are now operating as a Redundancy
Group.
Loading New Module Software
To load new Module software, follow these steps:
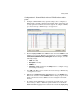
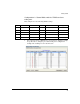
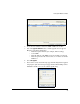
1. Select Management>System Maint. - Software. This screen lists the
Primary and Secondary Module software resident on the Module system.
In the example below, the Primary software is WT.01.00.img. The screen
indicates that this version of software was utilized for the current boot,
and will be used on the next boot. Note that the terms "Primary" and
"Secondary" represent flash memory locations, and different versions of
software can be stored in either location.