
HP Advanced Services zl Module with Citrix XenServer™ Platform Installation and Getting Started Guide

2-7
Management
Setting the Time on the XenServer
You also can use the XenServer shell to change the password. For more
information, search for “How to Change the Root Password Of A XenServer”
in the Knowledge Center on the Citrix Support site (http://support.citrix.com).
Setting the Time on the XenServer
Using the correct system time on the module is a pre-requisite for minimizing
conflicts and accessing some advanced features, such as pools, offered by
Citrix.
The time on the module is not preserved when the module is shut down, so
the time must be checked and set, if necessary, each time the module is booted
or reloaded. You may set the time automatically, using NTP, or manually. By
default, the module is configured to use NTP. Be sure to verify a connection
to an NTP server and to set the correct time zone when using NTP.
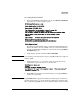
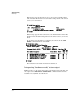
Use the menu-based xsconsole to manage network time on the module.
Changing or Adding Management IP
Addresses
Important By default, the module uses DHCP in switch VLAN 1 to acquire IP settings. If
successful, the Primary Management Interface IP address is displayed when
you access the XenServer shell from the switch. If no IP address is assigned,
IP address not configured is displayed. To access a DHCP server, add module
port <slot-ID> 2 as an untagged member to a VLAN that provides the DHCP
service required and restart the module using a XenServer management tool.
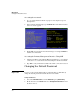
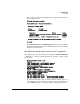
Use the menu-based xsconsole or XenCenter to manage the management
interfaces of the module.
Shutting Down XenServer
In the event that you need to shut down the XenServer, use one of the
XenServer management tools (xsconsole or XenCenter) to do so, as this will
ensure a graceful shutdown.