
HP Advanced Services zl Module with Citrix XenServer™ Platform Quick StartGuide

2-5
Getting Started
Getting Started
3. Select Quit from the top-level menu to return to the xe CLI.
4. Typing exit closes the xe CLI and logs you out. Type Control-z to return to
the switch CLI.
Accessing the Primary Management Interface Using SSH
1. Using the IP address of the Primary Management Interface, open a Telnet
connection to access the xe CLI, using the default credentials.
2. Type exit to end your xe CLI session. The connection is closed.
Changing the Default Password
Important To protect your network, HP strongly recommends that you immediately
change the default password for the XenServer host module.
Using XenCenter, select the Citrix-Xenserver host in the Resources pane (Server
View). On the menu bar, click on Server and select Change Server Password ...
from the list of choices. You also can use the XenServer shell to change the
password. For more information, search for “How to Change The Root Pass-
word Of A XenServer” in the Knowledge Center on the Citrix Support site
(http://support.citrix.com).
Setting the Time on the XenServer
Using the correct system time on the module is a pre-requisite for minimizing
conflicts and accessing some advanced features, such as pools, offered by
Citrix.
The time on the module is not preserved when the module is shutdown, so the
time must be checked and set, if necessary, each time the module is booted
or reloaded. You may set the time automatically, using NTP, or manually. By
default, the module is configured to use NTP. Be sure verify a connection to
an NTP server and to set the correct time zone when using NTP.
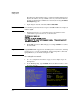
Use the menu-based xsconsole to manage network time on the module.
Changing or Adding Management IP Addresses
Important By default, the module uses DHCP in switch VLAN 1 to acquire IP settings. If
successful, the Primary Management Interface IP address is displayed when
you access the xe CLI from the switch. If no IP address is assigned, IP address