
HP Advanced Services zl Module with Microsoft® Windows Server® 2008 R2 Installation and Getting Started Guide

2-6
Getting Started
Obtain IP Connectivity to the Module
Set the VLAN and Determine the Module’s IP Address
You must now determine the IP address at which to contact the module.
(Sometimes the module receives a fixed DHCP address from a reservation,
but you should still verify that the proper address has been received.) In order
to do this, you must first set the VLAN for the module.
Follow these steps:
1. Access the HP zl switch CLI and move to the Global Configuration level.
2. You must specify the correct VLAN for the module; specify the VLAN for
the subnet to which the server that runs on the module is assigned. Enter
this command:
Note The instructions above are for specifying the VLAN for the module’s internal
interface 2, which is the interface that is enabled by default. (Remember: you
must never disable this port or the module will fault.)
You can also set the VLAN for the module’s internal interface 1 (<slot ID>1).
However, the Windows Local Area Connection associated with that port is
disabled by default.
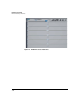
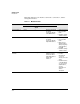
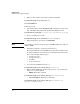
3. View the Services zl Modules installed in the switch:
hostzlswitch(config)# show services
You should see output similar to the following. Note the index number for
the service described as Branch Core Svcs Module-Standard. For example,
in Figure 2-2 you can see that the index number is 2.
Syntax: vlan <VLAN ID> [untagged | tagged] <slot ID>2
Replace <VLAN ID> with the ID of the VLAN for the module.
Generally, you should specify untagged. If you are configuring
802.1Q tagged VLANs on the server that runs on the module,
you can assign tagged VLANs to its port as well.
Replace <slot ID> with the ID of the slot in which the module
is installed.
For example, if the VLAN for the module is VLAN 10 and the
module is located in slot C, the command would be:
vlan 10 untagged c2