
HP Advanced Services zl Module with VMware® vSphere™ Platform Quick Start Guide


1-3
Hardware Installation
Installing the Module
Installing the Module
1. Confirm that the switch time is set and correct. For information on setting
the switch time, see the Installation and Getting Started Guide, available
at www.hp.com/networking/support.
2. If installing in an unused slot, use a Torx T-10 or flat-bladed screwdriver
to unscrew the screws in the cover plates over the slot where you will
install the module. Store the cover plates for possible future use.
3. Hold the module by its bulkhead, taking care not to touch the metal
connectors or components on the boards.
4. Open the extractor handles.
5. Insert the module, aligning with the guides in the slots, and slide it into
the slot until it is fully inserted.
6. Once the module is fully inserted, use the extractor handles to set it
completely.
7. Tighten the screws.
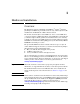
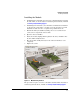
Figure 1-1. Module Being Installed
The procedure to replace or remove a module is described in the Installation
and Getting Started Guide, available at www.hp.com/networking/support.
Insert module into the guides
and slide in until fully
inserted.
Open extractor handles.