
HP Advanced Services zl Module with VMware® vSphere™ Platform Quick Start Guide


1-4
Hardware Installation
Installing the Module
Verifying That the Module Is Installed Correctly
If you have installed the module in a powered off HP zl switch, power up the
switch. After the switch powers up, the module will begin to power up. If you
have installed the module in a powered on switch, the module begins to power
up immediately.
Caution Do not remove the module or interrupt the power up process in any way. The
boot process may take several minutes to complete.
You can determine when this process is complete by viewing the Module
Status LED, which becomes solid green when the module is ready.
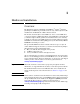
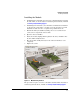
Figure 1-2. Module Front Panel LEDs and Ports
Whenever you reboot or power on the module, it goes through a similar bootup
and self test process. Again, the Module Status LED becomes solid green when
the module is ready.
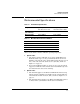
Table 1-1. LED Behavior
Error conditions indicated by the module LEDs are described in Appendix C
of the Installation and Getting Started Guide available on the web:
www.hp.com/networking/support.
Module
Shutdown button
Module
Locator LED
HDD and Network
activity LEDs
USB port
Management
port
Module Status
LED
LED Location of
LED
Display for a Properly Installed Module
Test Switch ON briefly while the module is undergoing self test, then OFF.
Note: If the module was installed with the switch powered off, and
then the switch was powered on, the Test LED will stay ON for the
duration of the switch self test.
The Test, Fault, and Module Status LEDs are clearly marked on the
E5400 zl or E8200 zl Series switch chassis.
Fault Switch OFF
Module
Status
Switch The LED goes ON as soon as the module is installed and the switch
is powered on, and stays ON steadily.
Module
Status
Module The LED is amber while the OS is initializing and goes solid green
when the Service OS or ESXi host is ready.
Figure 1-2 shows the location of all module LEDs.