
HP ProCurve Threat Management Solution Implementation Guide 2009-05


3-70
HP ProCurve Network Immunity Manager with a Third-Party IDS/IPS
Step 2: Detect Threats
To configure the IPS settings, complete the following steps:
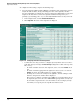
1. Set up the signature definitions. The UTM device maintains a table of signatures, and each
entry in the table includes, among other things, the name of the signature, whether
detection and logging are enabled, the action to be taken by the UTM, and the severity level
assigned to the attack. You can leave the signature definition settings as they are—
probably a good starting point—or you can modify individual entries to suit your needs.
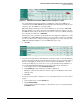
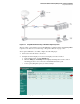
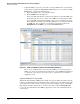
a. In the navigation bar, click the Intrusion Protection tab.
b. Click Signature. The table of virus signatures is displayed.
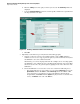
Figure 3-70. Configuring Intrusion Protection Signatures
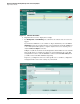
c. Scroll down to the entry you want to configure. (You may find it easier to scroll to a
particular entry if you change the Lines Per Page setting in the toolbar at the top of the
list to 1000.)
– To enable or disable detection of the signature, select or clear the Enable check
box.
– To enable or disable logging when the signature is detected, select or clear the
Logging check box. (You will typically leave logging enabled.)
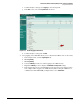
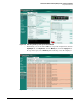
– To change the action or the severity for the signature, click the editing icon and
make the changes in the window that is displayed.
The action you configure controls how the UTM device responds when it detects
the signature (it does not affect how PCM+/NIM respond), and the severity sets
the level that is reported for the event. You will set event screening by severity
level when you set up the protection profile later in this section.