
HP ProCurve Threat Management Solution Implementation Guide 2009-05

4-39
HP ProCurve Network Immunity Manager with HP ProCurve Security Devices
Step 2: Detect Threats
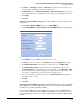
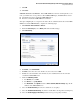
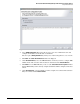
3. Configure the SNMPv3 trap server.
a. Select the Enable SNMPv3 traps check box.
b. Click Add another destination.
c. For Server Address, type the IP address of the PCM+/NIM server.
d. For Username, type the username configured for the SNMPv3 settings on the PCM+/
NIM server.
e. For Auth Passphrase, type a password.
f. From the Auth Protocol list, select MD5 or SHA-1.
g. For Privacy Passphrase, type a password.
h. For Privacy Protocol, select DES or AES.
i. Click OK.
4. Click Save.
Subtask: Configure DNS Server Settings
The TMS zl Module’s IPS uses signatures to check traffic for a variety of attacks and malware.
ProCurve regularly updates these signatures to keep your network protected against new
threats.
To receive the signatures and the updates, you must purchase an IDS/IPS signature subscription
and register it on the My ProCurve Portal (https://my.procurve.com). (For information about
registering the subscription, see the HP ProCurve Threat Management Services zl Module
Management and Configuration Guide.) Your TMS zl Module will then be able to automati-
cally check the HP ProCurve update server for updates and download them.
To access the HP ProCurve update server, the TMS zl Module must be able to contact a DNS
server and resolve the domain name. In addition, the module’s access policies must allow the
download, as explained later in this chapter.
Complete the following steps to configure DNS server settings:
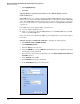
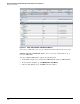
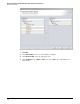
1. Click Network > Settings > General.
Figure 4-1. Network > Settings > General Window
2. For Primary Server, type the IP address of your primary DNS server.
3. Optionally, for Secondary Server, type the IP address of your secondary DNS server. If you
do not have a secondary DNS server, leave this field blank.
4. For Domain Suffix, type the suffix of your DNS domain name.