
HP ProCurve Threat Management Solution Implementation Guide 2009-05

4-42
HP ProCurve Network Immunity Manager with HP ProCurve Security Devices
Step 2: Detect Threats
Note It is not recommended that you enable logging permanently, because policy logging is
processor intensive. Use logging for troubleshooting and testing only.
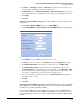
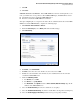
11. Optionally, in the Insert Position field, specify the priority of this access policy.
12. Click Apply, then optionally click the Advanced tab. The options in the Advanced tab allow
you to set a schedule for when the policy is enforced and to specify limits for the policy,
such as number of connections, number of kilobytes, and number of packets.
Repeat these steps to permit the following traffic:
■ Between Self and the zone that contains the PCM+/NIM server: SNMP traps and SSH
■ Between the zone that contains the PCM+/NIM server and Self: SNMP, SNMP traps,
and SSH
Subtask: Use NIM to Configure the TMS zl Module in Routing Mode
If you have more than one TMS zl Module, complete the initial setup on all of them. You can
then use NIM to configure all of your modules. With NIM, you easily apply the same access
policies to all modules, and customize some policies for each module, as needed.
This section describes how to:
■ Discover the TMS zl Module in PCM+
■ View zones and access policies
■ Configure zones and access policies using the NIM wizards
■ Configure IPS settings
In addition to performing these tasks, you can use NIM to configure Network Address
Translation (NAT) policies, port triggers, firewall settings, high availability, and user authenti-
cation. For information about configuring these tasks, see the HP ProCurve Network Immu-
nity Manager 2.0 Security Administrator’s Guide, which is available on the ProCurve Web
site (www.procurve.com).
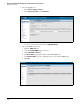
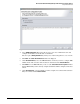
Subtask: Discover the TMS zl Module in PCM+. Complete the following steps:
1. Access the PCM+ management interface.
2. Click Tools > Manual Discovery.
3. When the Welcome window is displayed, click Next.
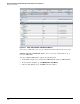
4. In the Enter Device Information window, enter the TMS zl Module’s IP address.
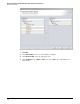
5. Click Next. The Connection Status window is displayed.
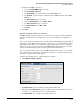
6. If PCM+ successfully establishes communication with the TMS zl Module, click Next. (If
there is a problem, check the SNMP settings on both the TMS zl Module and PCM+ and
make sure they match.)
The Discovery Status window is displayed. PCM+ might take a while to discover the TMS
zl Module’s configuration settings.
7. After PCM+ completes its discovery process, click Next.
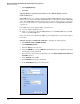
8. In the Discovery Finished window, click Finish.
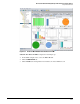
9. In the PCM+ navigation tree, select the ProCurve TMS zl Module folder. The Device Group
Dashboard is displayed.