
HP ProCurve Threat Management Solution Implementation Guide 2009-05


4-62
HP ProCurve Network Immunity Manager with HP ProCurve Security Devices
Step 2: Detect Threats
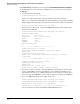
Subtask: Configure SNMP Settings
To enable management through PCM+ and NIM, you must configure the TMS zl Module’s SNMP
settings. The module supports SNMPv1/v2c or SNMPv3.
To configure SNMP settings, complete the following steps:
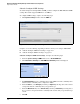
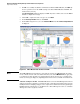
1. Click System > Settings and then click the SNMP tab.
Figure 4-7. TMS zl Module System > Settings > SNMP Window
Complete one of the following, depending on which version you are using on PCM+/NIM:
■ “Subtask: Configure SNMPv1/v2 Settings” on page 4-62
■ “Subtask: Configure SNMPv3 Settings” on page 4-63
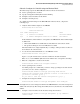
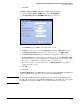
Subtask: Configure SNMPv1/v2 Settings. Complete the following steps:
1. From the System > Settings > SNMP window, select Enable SNMPv1/v2.
2. Click Add another community. The Add SNMPv1/v2 Community window is displayed.
Figure 4-8. Add SNMPv1/v2 Community Window
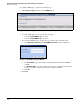
3. For Community Name, type the community name for the SNMP server. The community name
must match the community name configured on PCM+.
4. From the Role list, select Manager (read-write) or Operator (read only). Select the role that
corresponds with the community name you typed in step 3.
5. From the Write Access list, select Unrestricted (read-write) or Restricted (read only). Select
the access that corresponds with the community name and role that you specified in steps
3 and 4.
6. Click OK.