
HP ProCurve Threat Management Solution Implementation Guide 2009-05


4-98
HP ProCurve Network Immunity Manager with HP ProCurve Security Devices
Step 3: Respond to Threats
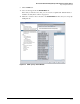
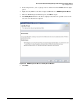
12. Click the Actions tab.
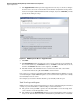
Figure 4-77. PCM+ <policy> > Actions Window
13. In the Available Actions list, select the action that you want the policy to execute when the
configured alert is received, and click the >> button to move the action to the Selected
Actions list. In the example, you could select MAC Lockout, Disable port, Rate limit, and
Quarantine VLAN. If the action you want is not in the Available Actions list, you can create
it as explained in “Step 3: Respond to Threats” on page 4-78.
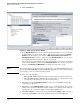
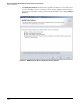
Note that you can specify multiple actions. If you have multiple actions, they are performed
in the order in which they are listed in the Selected Actions list. You can select an action
and then click Move Up and Move Down to rearrange the order of the actions.
Note The action is applied as soon as the policy is executed. If you are running IDM (and have not
specifically disabled IDM-NIM integration), IDM will reapply this action to the user should the
user attempt to connect to another switch port or AP.
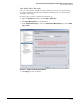
14. Select one of the following:
• Execute All—NIM performs all actions on all target devices in the specified order.
• Execute Until Success—NIM attempts actions in order on each target device until
an action succeeds, then moves on to the next target device.
15. Optionally, select the Act on Edge Ports Only check box if you want NIM to attempt the
actions only on edge ports.
16. Optionally, select the Rollback Actions check box to set a rollback interval. The action is
undone at the end of the rollback interval. For example, you could respond to an alert by
blocking the source port for five minutes and then unblocking the port.
17. Click Close or Apply to complete the policy definition. Clicking Apply completes the policy
definition; clicking Close completes the definition and closes the Policy Manager.