
HP ProCurve Threat Management Solution Implementation Guide 2009-05

C-56
Configure VPNs Using the HP ProCurve Threat Management Services zl Module
Configure a Client-to-Site IPsec VPN for Macintosh IPSecuritas Clients
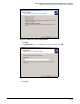
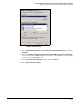
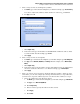
33. For Password, type the password that you specified for this dial-in user on the TMS zl
Module.
The password matches the setting in the Add Dial-In User—Step 2 of 3 window.
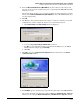
34. Click Connect. After a minute or so, you should see a message that informs you that the
connection was successful.
Configure a Client-to-Site IPsec VPN for
Macintosh IPSecuritas Clients
This section provides instructions for configuring the TMS zl Module as the gateway for a client-
to-site VPN for Macintosh IPSecuritas clients. The VPN will use IPsec with IKE version 1, but
not IKE mode config (because IPSecuritas does not support the TMS zl Module’s implementa-
tion of IKE mode config). This section also provides instructions for configuring a Macintosh
IPSecuritas client to participate in the VPN.
Configure a Client-to-Site IPsec VPN on the TMS zl Module
You must complete these tasks to configure a TMS zl Module as the gateway for an IPsec client-
to-site VPN:
1. Create named objects.
See “Create Named Objects for the IPsec Client-to-Site VPN” on page C-56. (Using named
objects is best practice; however, you can specify IP addresses manually.)
2. Create an IKE policy.
See “Create an IKE Policy for Connecting to IPSecuritas Clients” on page C-59.
3. Create an IPsec proposal.
See “Create an IPsec Proposal for Connecting to IPSecuritas Clients” on page C-62.
4. Create an IPsec policy.
See “Create an IPsec Policy for a Client-to-Site IPsec VPN with Macintosh IPSecuritas
Clients” on page C-64.
5. Create the necessary firewall access policies.
See “Access Policies for an IPsec Client-to-Site VPN for Macintosh IPSecuritas Clients” on
page C-69.
6. Create a static route, if necessary.
See “Verify Routes” on page C-71.
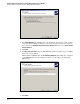
Create Named Objects for the IPsec Client-to-Site VPN
You can specify named objects in the IPsec policy traffic selector and in corresponding firewall
access policies. Note that an IPsec policy requires single-entry address objects, so you should
create objects of this type.
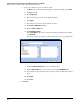
For this VPN configuration, create several address objects:
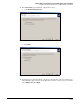
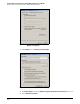
1. Click Firewall > Access Policies and then click the Addresses tab.
2. Click Add an Address.