
HP ProCurve Threat Management Solution Implementation Guide 2009-05


C-102
Configure VPNs Using the HP ProCurve Threat Management Services zl Module
Configure a Client-to-Site IPsec VPN for HP ProCurve VPN Clients
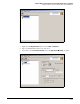
b. If the module’s IPsec proposal specifies ESP for the protocol, select the Encapsulation
Protocol (ESP) check box. Then match other settings in the module’s IPsec proposal:
–For Encrypt Alg, select the encryption algorithm specified on the module. For this
example, select 3DES.
–For Hash Alg, select the authentication algorithm specified on the module. For this
example, select MD5.
–For Encapsulation, leave Tunnel.
c. If the module’s IPsec proposal specifies AH for the protocol, select the Authentication
Header (AH) check box. Then match other settings in the module’s IPsec proposal:
–For Hash Alg, select the authentication algorithm specified on the module.
–For Encapsulation, leave Tunnel.
For this example, you do not select this check box.
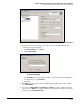
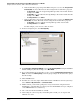
20. In the left navigation pane, click Security Policy.
Figure C-122. ProCurve VPN Client—Security Policy Editor—Security Policy
21. For Select Phase 1 Negotiation Method, match the Key Exchange Mode setting in the TMS zl
Module’s IKE policy. For this example, select Main Mode.
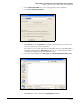
22. If you enabled PFS in the module’s IPsec policy, select the Enable Perfect Forward Secrecy
(PFS) check box. For PFS Key Group, match the group setting in the module’s IPsec policy.
For this example
23. Click the Save button.
24. To initiate the connection, right-click the HP ProCurve VPN Client icon in the system tray.
Select Connect > My Connections > <connection name>.
25. Within a minute, you should be prompted to enter your username and password for
XAUTH. Type credentials that are valid on your network’s RADIUS server (or configured
on the TMS zl Module’s local database).
26. The connection should establish successfully.
27. After testing the connection policy and ensuring that it works, you can export it and
distribute it to users: