
HP ProCurve Threat Management Solution Implementation Guide 2009-05

3-31
HP ProCurve Network Immunity Manager with a Third-Party IDS/IPS
Step 2: Detect Threats
3. Use the command-line interface (CLI) to set the
4200 Series Sensor
’s IP address and the
access list that lets you use the sensor’s Web browser interface. For example, the following
commands assign the sensor an IP address of 172.30.2.207 with a subnet mask of
255.255.255.0 and a default gateway of 172.30.2.1. The access-list command allows access
only from a management station at 172.30.2.111:
sensor# configure terminal
sensor(config)# service host
sensor(config-hos)# network-settings
sensor(config-hos-net)# host-ip 172.30.2.207/24,172.30.2.1
sensor(config-hos-net)# access-list 172.30.2.111/32
sensor(config-hos-net)# exit
sensor(config-hos)# exit
sensor(config)# exit
sensor#
Note that the
/24 notation indicates a subnet mask of 255.255.255.0 (24 bits), and the /32
notation indicates a subnet mask of 255.255.255.255 (32 bits).
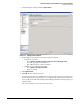
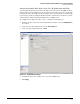
4. Make sure the Java plug-in on your management station is set up to run the sensor’s Web
browser interface. The interface requires version 1.4.2 or later of the plug-in and also
requires at least 256 MB of memory for the plug-in. Cisco recommends using Sun Micro-
systems Java.
The setup procedure is slightly different for the two versions of the plug-in:
• For Java version 1.4.2:
i. Open your system’s Control Panel application.
ii. Open the Java Plug-in applet.
iii. Click the Advanced tab.
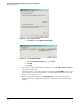
Figure 3-30. Advanced Tab of the Java Plug-in Applet
iv. In the Java Runtime Parameters field, type
-Xmx256m.
v. Click Apply.
• For Java version 1.5:
i. Open your system’s Control Panel application.
ii. Open the Java applet.
iii. Click the Java tab.