
HP VPN Firewall Appliances Access Control Configuration Guide

241
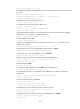
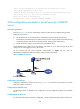
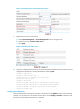
Figure 144 Creating the HWTACACS scheme named system
After the HWTACACS scheme is created, the HWTACACS server configuration page appears, as
shown in Figure 145.
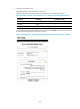
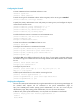
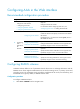
3. Configure the HWTACACS
authentication server:
a. Select Authentication Server as the server type.
b. Enter 10.1.1.1 as the IP address of the primary server.
c. Enter 49 as the TCP port of the primary server.
d. Select Shared Key, enter expert as the shared key, and then confirm it.
e. Click Apply.
Figure 145 Configuring an HWTACACS authentication server
4. Configure an HWTACACS authorization server:
a. On the page as shown in Figure 145, select Authorization Server as the server type.
b. Enter 10.1.1
.1 as the IP address of the primary server.
c. Enter 49 as the TCP port of the primary server.
d. Select Shared Key, enter expert as the shared key, and then confirm it.
e. Click Apply.
5. Configure an HWTACACS accounting server:
a. On the page as shown in Figure 145, selec
t Accounting Server as the server type.
b.
Enter 10.1.1.1 as the IP address of the primary server.
c. Enter 49 as the TCP port of the primary server.
d. Select Shared Key, enter expert as the shared key, and then confirm it.
e. Click Apply.
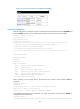
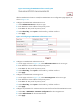
6. Configure the parameters for communication between the firewall and the HWTACACS server:
a. Select User > HWTACACS > Parameter Configuration from the navigation tree.
b. Select without-domain for the username format.
c. Click Apply.