
HP VPN Firewall Appliances High Availability Configuration Guide

12
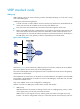
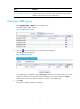
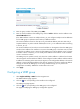
Figure 9 Creating a VRRP group
4. Enter the group number of the VRRP group (VRID).
5. Enter the virtual IP address of the VRRP group, and click Add to add the virtual IP address to the
Virtual IP Members field.
If the VRRP interface connects to multiple subnets, you can configure multiple virtual IP addresses
for the VRRP group to implement router backup on different subnets.
The virtual IP address cannot be all 0s (0.0.0.0), a broadcast address (255.255.255.255), a
loopback address, any other invalid IP address (like 0.0.0.1), or an address that does not belong
to class A, B, or C.
The virtual IP address can be either an unused IP address on the segment where the VRRP group
resides or the IP address of an interface on a router in the VRRP group. In the latter case, the router
is called the "IP address owner." Removal of the VRRP group on the IP address owner will cause
IP address collision. Therefore, you can modify the IP address of the interface on the IP address
owner to resolve the collision.
The VRRP group can operate correctly only when the virtual IP address is valid and on the same
network segment with the interface IP address. If the configured virtual IP address and the interface
IP address do not belong to the same network segment, or the configured IP address is the network
address or network broadcast address of the network segment to which the interface IP address
belongs, the state of the VRRP group is not always initialize though you can perform the
configuration successfully. VRRP does not take effect in this case.
6. Click Apply.
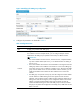
Configuring a VRRP group
1. Select High Availability > VRRP from the navigation tree.
The VRRP interfaces page appears.
2. Click the icon corresponding to the interface to be configured.
The VRRP group page appears.
3. Click the icon corresponding to the VRRP group to be configured.
The page for modifying the VRRP group configuration appears.