
HP VPN Firewall Appliances VPN Configuration Guide


286
Configuring Firewall B
The configuration for Firewall B is similar to that for Firewall A.
1. Create a PKI entity:
a. From the navigation tree, select VPN > Certificate Management > Entity.
b. Click Add.
c. Enter en as the PKI entity name, enter device-b as the common name, enter 3.3.3.1 as the IP
address of the entity, and click Apply.
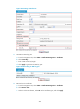
2. Create a PKI domain:
a. From the navigation tree, select VPN > Certificate Management > Domain.
b. Click Add.
c. The configuration page appears.
d. In the upper area of the page, enter 1 as the PKI domain name, enter CA1 as the CA identifier,
select en for the local entity, select RA for the authority for certificate request, enter
http://2.1.1.100/certsrv/mscep/mscep.dll as the URL for certificate request, enter 2.1.1.102
as the IP address of the LDAP server, 389 as the port number, and 2 as the version number, and
select Manual for the certificate request mode.
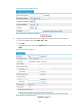
e. Click the expansion button before Advanced Configuration to display the advanced
configuration items.
f. In the advanced configuration area, click the Enable CRL Checking box, and enter
ldap://2.1.1.102 as the URL for CRLs.
g. Click Apply.
h. The system displays "Fingerprint of the root certificate not specified. No root certificate
validation will occur. Continue?"
i. Click OK
to confirm.
3. Generate an R
SA key pair:
a. From the navigation tree, select VPN > Certificate Mana
gement > Certificate.
b. Click Create Key.
c. Enter 1024 as the key length.
d. Click Apply to generate an RSA key pair.
4. Retrieve the CA certificate:
a. From the navigation tree, select VPN > Certificate Management > Certificate.
b. Click Retrieve Cert.
c. Select 1 for the PKI domain, select CA for the certificate type, and click Apply.
5. Request a local certificate:
a. From the navigation tree, select VPN > Certificate Management > Certificate and then click
Request Cert.
b. Select 1 for the PKI domain.
c. Click Apply. When the system displays "Certificate request has been submitted", click OK to
confirm.
6. Retrieve the CRL:
a. After retrieving a local certificate, select VPN > Certificate Management > CRL from the
navigation tree.