
HP VPN Firewall Appliances VPN Configuration Guide


81
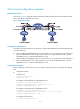
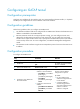
Configuring an ISATAP tunnel
Configuration prerequisites
Configure an IP addresses for the interface (such as a VLAN interface, Ethernet interface, or loopback
interface) to be configured as the source interface of the tunnel interface.
Configuration guidelines
Follow these guidelines when you configure an ISATAP tunnel:
• No destination address needs to be configured for an ISATAP tunnel because the destination IPv4
address is embedded in the ISATAP address.
• Because automatic tunnels do not support dynamic routing, you must configure a static route
destined for the destination IPv6 network at each tunnel end. You can specify the local tunnel
interface as the output interface of the route or specify the IPv6 address of the peer tunnel interface
as the next hop of the route. For more configuration, see Network Management Configuration
Guide.
• The automatic tunnel interfaces using the same encapsulation protocol cannot use the same source
IP address.
Configuration procedure
To configure an ISATAP tunnel:
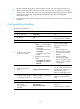
Ste
p
Command
Remarks
1. Enter system view.
system-view N/A
2. Enable IPv6.
ipv6
By default, the IPv6 forwarding
function is disabled.
3. Enter tunnel interface view.
interface tunnel number N/A
4. Configure an IPv6 address for
the tunnel interface.
• Configure an IPv6 global unicast
address or site-local address:
{ ipv6 address { ipv6-address
prefix-length |
ipv6-address/prefix-length }
{ ipv6 address
ipv6-address/prefix-length
eui-64
• Configure an IPv6 link-local
address:
{ ipv6 address auto link-local
{ ipv6 address ipv6 address
link-local
The IPv6 link-local address
configuration is optional.
By default:
• No IPv6 global unicast
address is configured for the
tunnel interface.
• A link-local address is
automatically generated
when an IPv6 global unicast
address or link-local
address is configured.