ProCurve ONE Advanced Services zl Module Installation and Getting Started Guide
HP ProCurve ONE Advanced Services zl Module Installation and Getting Started Guide
© Copyright 2010 Hewlett-Packard Development Company, L.P. Disclaimer HEWLETT-PACKARD COMPANY MAKES NO WARRANTY OF ANY KIND WITH REGARD TO THIS MATERIAL, INCLUDING, BUT NOT LIMITED TO, THE IMPLIED WARRANTIES OF MERCHANTABILITY AND FITNESS FOR A PARTICULAR PURPOSE. Hewlett-Packard shall not be liable for errors contained herein or for incidental or consequential damages in connection with the furnishing, performance, or use of this material.
Contents 1 Hardware Installation Module Overview . . . . . . . . . . . . . . . . . . . . . . . . . . . . . . . . . . . . . . . . . . . . . . . 1-1 Installing the Module . . . . . . . . . . . . . . . . . . . . . . . . . . . . . . . . . . . . . . . . . . . . 1-2 Installation Precautions . . . . . . . . . . . . . . . . . . . . . . . . . . . . . . . . . . . . . . 1-2 Installation Procedure . . . . . . . . . . . . . . . . . . . . . . . . . . . . . . . . . . . . . . .
Taiwan . . . . . . . . . . . . . . . . . . . . . . . . . . . . . . . . . . . . . . . . . . . . . . . . . . . A-2 European Community Declaration of Conformity . . . . . . . . . . . . . . . A-2 B Waste Electrical and Electronic Equipment (WEEE) Statements C Hardware Components Front Panel Buttons, LEDs, and Connectors . . . . . . . . . . . . . . . . . . . . . . . C-1 Internal Ports . . . . . . . . . . . . . . . . . . . . . . . . . . . . . . . . . . . . . . . . . . . . . . . . . C-2 Serial Numbers . . . . . .
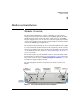
Hardware Installation Module Overview 1 Hardware Installation Module Overview The HP ProCurve ONE Advanced Services zl Module is a x86 platform designed to integrate Open Network Ecosystem (ONE) applications within the HP ProCurve switch architecture. These applications are called ONE Integrated Applications, and can offer more value than applications running on stand-alone appliances. The module provides facilities to download, install, and activate ONE Integrated Applications.
Hardware Installation Installing the Module For a description of the front panel buttons and LEDs, see Table C-1 on page C-2 in the Web version of this document at www.hp.com/go/procurve/manuals. Note The printed version of this document contains the basic information needed to get you started using the module. It also contains EMC Regulatory Statements (Appendix A) and Waste Electrical and Electronic Equipment (WEEE) Statements (Appendix B).
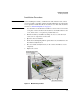
Hardware Installation Installing the Module Installation Procedure Note Before installing the module, confirm that the switch has the most current version of module-compatible software installed. Otherwise the switch will not recognize the module. For directions on how to check the switch software version, see “Initial Configuration” on page 2-3. 1. Use a Torx T-10 or flat-bladed screwdriver to unscrew the screws in the cover plate over the slot where the module is to be installed.
Hardware Installation Installing the Module The procedure to replace or remove a module is described on page C-5 in the Web version of this document at www.hp.com/go/procurve/manuals. Appendix C also describes the procedure to replace the module’s Hard Disk Drive (HDD) and the Compact Flash (CF) card. Verifying that the Module is Installed Correctly When the module is installed, it undergoes a self test that takes a few seconds.
Hardware Installation Environmental Specifications Environmental Specifications Temperature Operating Non-Operating 0C to 45C (32F to 113F)a -10C to 65C (-10F to 149F) Relative humidity (non-condensing) 15% to 90% at 40C (104F) 15% to 90% at 65C (149F) Maximum altitude 3.0 km (10,000 ft) 4.6 km (15,000 ft) a. A maximum of 4 of these modules may be installed in any zl switch (except the 8206zl chassis, which supports a maximum of 2 of these modules).
Getting Started 2 Getting Started When the Advanced Services zl Module is shipped, it includes the hardware along with the HP ProCurve Service Operating System (OS). The primary and backup Service OS reside on the Compact Flash (CF). The module does not ship with any ONE Integrated Applications (ONE-app) installed. When the module is installed in a switch for the first time, the system boots directly into the Service OS.
Getting Started The figure below shows where the Service OS and the ONE Integrated Application reside on the module. Hard DISK (HD) ONE Integrated Application Compact Flash (CF) Service OS Figure 2-1. Module Operating System and Application CLI commands are available to boot the module from one OS to another. The following examples show the CLI commands to switch between operating systems. “:SvcOS” means the module is booted to the Service OS, and “:App” means the module is booted to the ONE-app.
Getting Started Initial Configuration Initial Configuration The Command Line Interface (CLI) must be used to carry out the steps required to configure the module. The module CLI is accessed through the switch CLI, and is available in the Service OS (full command set) and ONE-app (limited command set). Updating Switch Software Before configuring the module, access the switch CLI to verify the switch has the most current module-compatible software installed.
Getting Started Initial Configuration An example output from this command looks as follows: Status and Counters - Services Module C Status HP Services zl Module J9483A Versions : A.01.03, B.01.05 Current status : running Description Version Status --------------- ------------------- --------Services zl Module B.01.05 running Application J0000 0.5 licensed Updating Module Software The module maintains a repository of the software images that are downloaded to it.
Getting Started Initial Configuration Service OS Installation Periodically, Service OS updates are available from HP ProCurve. To check the Service OS version installed on the module, first boot the Service OS, if it is not already booted. Then, access the module’s Service OS CLI: hostswitch# services c 1 Then, use the following CLI command: hostswitch(svcs-mod-C:SvcOS)# show version This command will show the version number for the Service OS.
Getting Started Selecting a ONE Integrated Application Selecting a ONE Integrated Application To select a ONE Integrated Application, go to the ONE web site at www.procurve.com/one. Navigate to ProCurve ONE Applications at www.procurve.com/one/applications. As an example, navigate to Network Management at www.procurve.com/one/applications/network.htm. Navigate to InMon Traffic Sentinel at www.procurve.com/one/alliance/inmon/trafficsentinel.htm There is a ONE-Integrated logo on the right side of the page.
Getting Started Downloading a ONE Integrated Application to the zl Module Downloading a ONE Integrated Application to the zl Module Using the Service OS CLI, a user can download a ONE Integrated Application to the zl module via the network or through the USB interface or to the CF module. The ONE Integrated Application is certified, that is, signed and encrypted to authenticate that it is from HP ProCurve. Once validated, the bits are stored on the module's hard disk and are ready for installation.
Getting Started Downloading a ONE Integrated Application to the zl Module 4. Download the ONE-app: hostswitch(svcs-mod-C:SvcOS)# download ftp 5. Check the images repository to verify that the ONE-app was downloaded to the module: hostswitch(svcs-mod-C:SvcOS)# show images To download a ONE-app from a USB, follow these steps: 1. From a Windows PC, download the “zip” file that contains the ONE Integrated Application. 2. Insert a USB flash drive into the PC.
Getting Started Installing a ONE Integrated Application Installing a ONE Integrated Application The installation process takes a downloaded ONE Integrated Application image and writes the image out in the appropriate partitions on the hard disk.
Getting Started Activating a ONE Integrated Application 1. Access the Service OS CLI. For a module installed in switch slot ‘C’, enter: hostswitch# services c 1 2. Obtain the Hardware ID of the module: hostswitch(svcs-mod-C:SvcOS)# licenses hardware-id activation 3. Point your Web browser to the My ProCurve portal (https://my.procurve.com). 4. If you are a new user, click the Register Here button and enter the required information. 5.
Getting Started Using Multiple ONE Integrated Applications Caution A ONE-app index number is subject to change. ONE-app Indices (the index is the number '2' in the command services c 2) for multiple applications (for example, HP ProCurve PCM+ Agent Application versus HP ProCurve Threat Management Services zl Module versus HP ProCurve MSM765zl Mobility Controller) in the same switch may change whenever any one of the modules reboots.
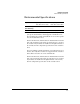
Troubleshooting HP Customer Support Services 3 Troubleshooting Detailed troubleshooting information for the module is available at www.hp.com/go/procurve/manuals. HP Customer Support Services HP offers support 24 hours a day, seven days a week through the use of a number of automated electronic services. See the Customer Support/Warranty booklet that came with the product for information on how to use these services to get technical support. The HP ProCurve Web portal, at www.hp.
EMC Regulatory Statements A EMC Regulatory Statements U.S.A. - FCC Class A This equipment has been tested and found to comply with the limits for a Class A digital device, pursuant to Part 15 of the FCC Rules. These limits are designed to provide reasonable protection against interference when the equipment is used in a commercial environment.
EMC Regulatory Statements Japan - VCCI Class A Korea Taiwan European Community Declaration of Conformity This product is designed for operation with the HP ProCurve switches that have zl module slots. Refer to the Declarations of Conformity included in the Installation Guides for those products.
Waste Electrical and Electronic Equipment (WEEE) Statements B Waste Electrical and Electronic Equipment (WEEE) Statements Disposal of Waste Equipment by Users in Private Household in the European Union This symbol on the product or on its packaging indicates that this product must not be disposed of with your other household waste.
Waste Electrical and Electronic Equipment (WEEE) Statements Laitteiden hävittäminen kotitalouksissa Euroopan unionin alueella Jos tuotteessa tai sen pakkauksessa on tämä merkki, tuotetta ei saa hävittää kotitalousjätteiden mukana. Tällöin hävitettävä laite on toimitettava sähkölaitteiden ja elektronisten laitteiden kierrätyspisteeseen.
Waste Electrical and Electronic Equipment (WEEE) Statements Smaltimento delle apparecchiature da parte di privati nel territorio dell'Unione Europea Questo simbolo presente sul prodotto o sulla sua confezione indica che il prodotto non può essere smaltito insieme ai rifiuti domestici. È responsabilità dell'utente smaltire le apparecchiature consegnandole presso un punto di raccolta designato al riciclo e allo smaltimento di apparecchiature elettriche ed elettroniche.
Waste Electrical and Electronic Equipment (WEEE) Statements Descarte de Lixo Elétrico na Comunidade Européia Este símbolo encontrado no produto ou na embalagem indica que o produto não deve ser descartado no lixo doméstico comum. É responsabilidade do cliente descartar o material usado (lixo elétrico), encaminhando-o para um ponto de coleta para reciclagem.
Hardware Components Front Panel Buttons, LEDs, and Connectors C Hardware Components Front Panel Buttons, LEDs, and Connectors This section describes the different buttons, LEDs, and connectors on the front panel of a module: ■ Module Shutdown button: This button is used to shut down the module. A message is written to the switch log to indicate the module has shut down.
Hardware Components Internal Ports Table C-1. Module LEDs Module LED State Module Statusa (green/ orange) Meaning When the module is first installed, this LED follows the following sequence: 1. Green for ~15s - The module has power. 2. Orange for ~11s - Testing the LED. 3. Green for ~4s - Starting self-test. 4. Orange for ~30s - Self-test in progress. 5. Off - The module is booting the OS. Flashing green Service OS or ONE-app software is initializing or shutting down.
Hardware Components Serial Numbers Serial Numbers Serial numbers are required when contacting HP or a reseller for warranty assistance or for coverage under a service agreement. For future reference, record the serial and product numbers in the warranty booklet. The product ships as a bundle.
Hardware Components Serial Numbers The serial number of the module also can be obtained through the CLI by using the following command: hostswitch# show modules Status and Counters - Module Information Chassis: 5406zl J8697A Management Module: J8726A Serial Number: Serial Number: Slot Module Description ----- ----------------------------------C D SG736SU06F SG736SU06F Serial Number --------------- ProCurve J9483A ONE Adv Svs zl Module SG811GG009 ProCurve J9483A ONE Adv Svs zl Module SG811GG00Q The se
Hardware Components Switch LEDs Switch LEDs The following figures show the Test, Fault, and Module Status LEDs on the switches the module can be installed in. Test LED Fault LED Module Status LEDs Figure C-3. Test, Fault, and Module Status LEDs on a Series 5400zl switch Fault LED Test LED Module Status LEDs Figure C-4. Test, Fault, and Module Status LEDs on a Series 8200zl switch Replacing or Removing a Module It is highly recommended that the module be shutdown before replacing or removing it.
Hardware Components Replacing the Disk Drive Caution A 5-second delay is mandatory between removing a module, and either reinstalling it, or replacing it with another. To replace one module with another, or to remove a module without replacing it, use the following procedure: Caution 1. Unscrew the retaining screws enough to disconnect them from the threaded holes in the switch. 2. Using the extractor handles pull the module out from the slot. 3.
Hardware Components Replacing the Disk Drive 7. Install the new disk drive and slide it forward to engage the connector. 8. Re-install the four retaining screws. 9. If applicable, remove the cover from the slot where the module will be re-installed. Re-install the module into the switch. 10. Use an equal amount of pressure and push both extractor handles closed to completely seat the module. 11. Tighten the retaining screws. 1. 2. Extractor Handles Retaining Screws 3. 4.
Hardware Components Replacing the Compact Flash Replacing the Compact Flash The following is the procedure for replacing the compact flash in the module. The module may be removed while the switch is powered on. The numbers in Figure C-6 correspond to the step numbers below. 1. Using either a flat-bladed or Torx T-10 screwdriver loosen the retaining screws securing the module. 2. Using the extractor handles, pull the module out from the slot and turn it over.
Hardware Components Replacing the Compact Flash 3. 4. Figure C-6.
Software Components Updating Switch Software D Software Components Updating Switch Software The module requires switch software version K.14.58 or later to be installed in the switch. When an update is needed, use the following steps to update the switch software: 1. Visit the HP ProCurve Web portal atwww.hp.com/go/procurve to check the version number of the latest module-compatible software. 2. Check the version number of the software installed on the switch.
Software Components Updating the Service OS Updating the Service OS There are two ways to update the Service OS: Note ■ via FTP: used when a local FTP server is accessible from the module ■ via USB: used when a local FTP server is not accessible from the module The process of updating the Service OS is faster if the switch is accessed via Telnet or SSH; the serial console slows down the writing of characters to the screen, causing a significantly slower installation speed, especially if the switch co
Software Components Updating the Service OS hostswitch(svcs-mod-C:SvcOS)# update ServiceOS 6. Boot the Service OS (optionally, boot the ONE-app, if one is installed): hostswitch(svcs-mod-C:SvcOS)# boot ServiceOS Changing boot from CF Service OS to Service OS. System will be rebooted. Do you want to continue [y/n]? y Rebooting 7.
Software Components Updating the Service OS Updating Service OS via USB Note Any image folder (Service or application) can be put on a USB flash drive and transferred to the Service image repository. 1. Insert a USB flash drive into a Windows PC. Make sure the drive is FAT/ FAT32 formatted and can hold all files that will be downloaded. 2. Download the entire folder that contains the Service OS to the PC. 3. Copy the Service OS folder to the USB flash drive as a subdirectory under a /images folder.
Software Components Device Disable Device Disable The module offers improved security and reliability. In case there is no physical security on the chassis, the USB and the shutdown button can be disabled to prevent unauthorized or undesired access. Both the USB and the shutdown button are enabled by default. The USB is disabled during boot. Use the "device" command without an argument to show the devices enabled/ disabled.
Software Components ONE-app Activation ONE-app Activation Installing a License This step may be optional, depending on the selected ONE Integrated Application. If the application has its own application-specific licensing, there is no need to apply HP ProCurve’s licensing and activation.
Software Components ONE-app Activation ■ license key — This number is generated at https://my.procurve.com, based on a registration ID and a hardware ID. When this number is installed into the module, it activates the ONE-app installed on the module. ■ uninstall verification key — This number is generated if a ONE-app is uninstalled from a module.
Software Components ONE-app Activation The following figure summarizes the process to activate the ONE-app: Figure D-1.
Software Components ONE-app Activation The process details are provided below: 1. Using the switch CLI boot the Service OS on the module. Then enter the following: hostswitch# services c 1 This assumes the module is in slot C. Enter this command at the next prompt: hostswitch(svcs-mod-C:SvcOS)# licenses hardware-id activation The CLI returns a Hardware ID number. This number is entered on the My ProCurve portal in step 3 below. 2. Go to https://my.procurve.com and sign in to access the My ProCurve page.
Software Components ONE-app Activation Click Generate License key to continue to the Registration ID page. Enter the registration ID number in the Registration ID field. (This number is not case-sensitive.) It is located at the bottom of the card that is included with the license product. Click Next to enter the registration ID number and to continue to the Hardware ID page.
Software Components ONE-app Activation 3. Enter the Hardware ID copied from the console session (from Step 1). Optionally, enter notes in the Customer Notes field. These might, for instance, identify which device has been licensed and where it is located. These notes are kept, along with the registration ID number, in your user account on the My ProCurve portal. Click Next to continue to the License Agreement page.
Software Components ONE-app Activation Read the license terms, check I agree to the license terms, and click Next. This generates a license key and displays it on the License Key Confirmation page. You may save the license key on your local computer or have it sent to an email address. This license key will be entered into the CLI in the next step. 4. Enter this command at the module’s CLI prompt: hostswitch(svcs-mod-C:SvcOS)# licenses install activation The key is case-sensitive.
Software Components ONE-app Activation Changing boot from Service OS to ONE-app. System will be rebooted. Do you want to continue [y/n]? y Rebooting This returns the user back to the switch context. The module is ready to use when the following command shows “running” as the current status: hostswitch(config)# show services c Status and Counters HP Services zl Module Versions : Current status : Services Module C Status J9483A A.01.03, B.01.
Software Components ONE-app Activation To view all the registration ID numbers in a My ProCurve account, follow these instructions. 1. Go to https://my.procurve.com and sign in. 2. Click My Licenses. 3. Click View licenses. 4. To use a registration ID to install a license in a ProCurve module, select an entry in the table that has a license type appropriate for the module and click Generate License.
Software Components ONE-app Activation Exporting the License Summary To export the License Summary to a spreadsheet, click Export licenses. Choose the export format — Microsoft® Excel (.xls) format or commaseparated values (CSV) in a text file (.txt). The browser gives a choice of saving the information in a file or opening it in a spreadsheet or a text editor.
Index A Activating a ONE-app … 2-9 C CLI Command boot ONE-app … D-3, D-12 licenses hardware-id activation … 2-10, D-9 services … 2-10 show licenses … D-12 show services … D-13 show version … D-1 shutdown … C-1, C-5 uninstall ONE-app … D-13 Command Line Interface (CLI) … 1-1, 2-3 Switch … 2-3, C-2, D-1, D-9 Compact Flash … 2-1 D Device Disable … D-5 Downloading a ONE-app … 2-7 Downloading Multiple ONE-apps … 2-11 E EMC Regulatory Statements … A-1 Environmental Specifications … 1-5 Error Conditions … 1-4
Module Front Panel … 1-1, C-1 Module Shutdown … C-1 USB Port … C-1 Module Overview … 1-1 My ProCurve … 2-10, D-6, D-7, D-9, D-11, D-13, D-14 O ONE Integrated Application … 2-1 ONE-app … 2-7, D-2, D-13 OS Updates … D-2 R Registration ID … 2-10, 2-11, D-6, D-7, D-10, D-11, D-13, D-14 Registration ID Page … D-10 Replacing the Compact Flash … C-8 Replacing the Disk Drive … C-6 S Serial Numbers … C-3 Service image … 2-4 Service OS … 2-1, D-4 Updates … 2-5 show images … 2-8, 2-9 Switch Software Updates … D-1 S
Technology for better business outcomes To learn more, visit www.hp.com/go/procurve/ © Copyright 2010 Hewlett-Packard Development Company, L.P. The information contained herein is subject to change without notice. The only warranties for HP products and services are set forth in the express warranty statements accompanying such products and services. Nothing herein should be construed as constituting an additional warranty.