
Management and Configuration Guide (Includes ACM xl) 2005-12


ProCurve Secure Access 700wl Series Management and Configuration Guide 4-71
Configuring Rights
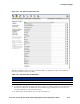
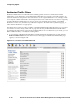
The Redirected Traffic list shows the Redirected Traffic filters in alphabetical order, and includes the
following information about each filter:
» To edit a filter, click the filter name in the Name column, or click the pencil icon at the end of the row.
This takes you directly to the Edit Filter: Redirected Traffic page to edit the entry for this user (see
“Creating or Editing a Redirected Traffic Filter” on page 4-71).
» To delete a filter, click the trash can icon at the end of the row.
» To create a new filter, click the New Filter button at the bottom of the filter list. This takes you to the New
Filter: Redirected Traffic page (see “Creating or Editing a Redirected Traffic Filter”).
From this page you can also go directly to the Access Policies, QoS Markings, Redirected Traffic Filters,
or HTTP Proxy FIlters pages using the links directly under the page name in the left-hand panel of the
page. See “Access Policies” on page 4-35, and “Time Windows” on page 4-33 for details on these
functions.
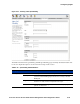
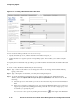
Creating or Editing a Redirected Traffic Filter
To create a new Redirected Traffic Filter, click the New Filter button found either on the Redirected
Traffic Filters page or under the Redirected Traffic tab on the New Access Policy or Edit Access Policy
pages.
The New Filter: Redirected Traffic page appears (Figure 4-35) with empty fields.
The Edit Filter: Redirected Traffic page is almost identical to the New Filter page, except that the name,
description, and the filter and destination definitions are displayed for the filter you have selected, and
a
Save As Copy button is provided.
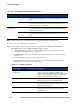
Table 4-29. Allowed Traffic List Definitions
Column Description
Name The name for the Redirected Traffic Filter.
Details The optional description of the filter.