
Management and Configuration Guide (Includes ACM xl) 2005-12


5-42 ProCurve Secure Access 700wl Series Management and Configuration Guide
Configuring Authentication
Customizing the Logo
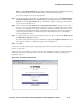
In the Logos section of the New/Edit Logon Customization page you can customize the logo (image)
that appears on the logon and logoff web pages. The filename of the current logo is displayed
underneath the filename entry field for the logo, along with the date that the logo was uploaded to the
Rights Manager. The HP logo is the default logo.
You can use two different logos, a standard logo and a small logo. For clients with small browser
screens, such as PDAs or mobile phones, the Rights Manager provides a Small Logo more appropriate
to the size of a small screen. You can change this logo to be a small version of your own logo for use with
small browsers.
To change either logo, do the following:
Step 1. Go to the Logos section of the New/Edit Logon Customization page and select the logo you wish
to change.
Step 2. In either the Logo or the Small Logo field, type the full path and name of a file, on your local
system, format that contains the logo you want
or
Click
Browse to locate the proper directory and file name.
This file can be a GIF, JPEG, or PNG file, or any other browser-compatible graphic file format.
Step 3. You can link the logo to a URL (for example, your organization’s corporate web site) so that a
user can click on logo on the logon page to go to your site. Enter the appropriate URL in the
Logo URL field provided, this should include the “http://” prefix.
The default URL is
http://www.procurve.com.
Step 4. Click Save at the bottom of the page to save these changes.
Click
Cancel to abandon any changes you have made without saving them.
To restore the default logo, click
Reset to Defaults at the bottom of the page.
Note:
Clicking Reset to Defaults will reset all the settings for this Logon Customization page (and
the associated stop page) to the default settings.
Customizing the Logon Page Text
You can add text to a Logon Customization page with any text and HTML formatting commands you
want displayed on the Logon Customization page.
To add or edit text for the Logon Customization page:
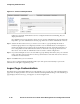
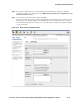
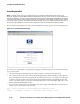
Step 1. Go to the Logon Page section of the New/Edit Logon Customization page, as shown in
Figure 5-24.
Step 2. In the text box labeled Logon Page Text enter the text you want to display to the logon user.
This can include HTML formatting commands.
Step 3. Click Save.
To clear the logon page text after it has been set, click
Reset to Defaults at the bottom of the page.