
Management and Configuration Guide (Includes ACM xl) 2005-12


ProCurve Secure Access 700wl Series Management and Configuration Guide 5-43
Configuring Authentication
Note: Clicking Reset to Defaults will reset all the settings for this Logon Customization page (and
the associated stop page) to the default settings, not just the logon page text.
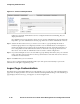
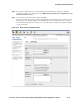
You can also change several Logon Page Options:
Step 1. You can specify who is allowed to logon through this logon page. Choose either Registered Users
and Guests
, Registered Users only, or Guests only. These settings determine whether the Logon
User
button or the Logon as Guest button, or both buttons, appear on the page, allowing such
logons, as shown in Figure 5-25.
Step 2. Place a check mark in the Allow users to specify authentication policies check box if you want
users to choose a specific Authentication Policy from a group of Authentication Policies. When
this option is checked, the Logon page will display a drop-down field that will allow a user to
select from the Authentication Policies configured for the 700wl Series system. For example, in
a University users could choose the Business School Authentication Policy or the Medical
School Authentication Policy.
Step 3. To require Guest users to go through a registration process, place a check in the Require guests
to register before logging on
check box.
If you choose this option, the Logon as Guest button is replaced by a
Register as Guest button, and
the Guest user is taken to a registration page, as shown in Figure 5-26.
Step 4. Click Save.
You can also have the system display a logoff page when users log onto the system, see “Logoff Page
Option” on page 5-45.
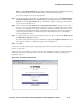
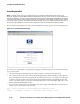
Figure 5-25 shows an example of a customized logon page. In addition to the logo and text, it includes
a field with a drop-down list where the user can choose an Authentication Policy, and the guest
registration option.
Figure 5-25. Customized Logon Screen