
Management and Configuration Guide (Includes ACM xl) 2005-12


ProCurve Secure Access 700wl Series Management and Configuration Guide 2-15
Using the 700wl Series System
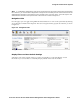
Common Buttons
The following table lists the common buttons used in the Administrative Interface and gives their
meaning.
Basic System Configuration Tasks
When you have completed the installation of your 700wl Series system following the instructions in the
700wl Series system Quick Start Guide
or the
700wl Series system Installation and Getting Started
Guide
, there are still some basic configuration tasks you may need to perform.
• If you have not done so already, change your administrator logon username and password. See
“Changing the Built-In Administrator Settings” on page 2-5.
• To install and configure more Access Controllersor configure the 700wl Series system components
to be monitored by SNMP, read Chapter 6, “Configuring the Network”.
• To add users to the system and specify what access rights they should have, read Chapter 4,
“Configuring Rights”.
• To specify one or more externalAuthentication Services, LDAP, RADIUS, Kerberos or XML-RPC,
802.1X or NT Domain logon, for user authentication, read Chapter 5, “Configuring Authentication”.
• To specify Access Policies that define permitted access for users, read Chapter 4, “Configuring
Rights”.
• To enable and configure the 700wl Series system to allow access using VPN protocols, read
Chapter 7, “Setting up Wireless Data Privacy”.
• Once the 700wl Series system is up and running, and you want to monitor system and client status
you should read Chapter 3, “System Status”.
• When you are ready to back up your 700wl Series system configuration, read “Backing Up and
Restoring the System Configuration” in Chapter 8, “System Maintenance”.
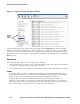
Button Function
Folder: This represents a user-defined folder for system components. Folders can be opened, revealing their
contents, by clicking on the open folder button
(). They can be closed by clicking on the close folder button
(). This button appears in the System Components List. See the example in Figure 2-5.
Edit: Click this button to edit the row entry. If the row cannot be edited, the button is dimmed.
See Figure 2-8 for an example of this button.
Remove: Click this button to delete the row entry. If the row cannot be deleted, the button is dimmed.
See Figure 2-8 for an example of this button.
ReOrder: Click the up or down arrows to move the row up or down in the table. If the row is at the top or
bottom of the table, only one arrow is enabled. If a particular row cannot be moved, the button is dimmed. See
Figure 2-8 for an example of this button.
View: Click this button to view supporting information about a particular function. This button appears in the
New/Edit Filter pages for Allowed and Redirected Traffic Filters.
Refresh Rights: Click this button to update the rights for the client in the same row. This button appears in the
Client Status table.
Logout: Click this button to log out the client associated with the row. This button appears in the Client Status
table.