
Management and Configuration Guide (Includes ACM xl) 2005-12
ProCurve Secure Access 700wl Series Management and Configuration Guide 4-13
Configuring Rights
getting rights based on matching this Identity Profile in the Rights Table. It is possible that the
user could still get a set of rights based on matching a different Identity Profile.
When the concurrent logon limit is reached, the next client to log on using that username and
password is still authenticated successfully, since the username and password are presumably
still valid. The user will not match any rows in the Rights Table that use this Identity Profile, but
could match a different Identity Profile and get rights based on that. For example, because this
user could authenticate successfully, it will match the default “Authenticated” Identity Profile. If
you have a row in your Rights table for the Authenticated Identity Profile, the user will get
whatever rights are associated with that row.
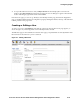
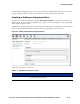
Step 3. To include Users or Network Equipment from the built-in database in this Identity Profile:
a. Check the Show all users and network equipment in the built-in database option and click Save
to display the built-in database entries.
b. Click the Users or Network Equipment tab to display the appropriate list.
c. Click the check boxes of the individual users or equipment items you want to include in this
Identity Profile.
You can select the check box next to the
Name column heading to select all items in the list.
Clicking this check box a second time removes the checks from all items in the list.
Note:
You can skip this step if you are using this Identity Profile only to match an external group
or domain.
Step 4. Click Save to save this Identity Profile. If you are editing an existing Identity Profile, this
replaces the original profile with the modified profile definition
Cancel returns you to the previous page without saving any changes.
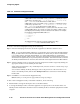
To edit an existing Identity Profile:
» To change the name of a profile, type a new name.
» To add a user or equipment item (assuming the appropriate list is displayed) click its check box.
» To remove a User or equipment item from the profile, click its check box again to remove the check.
You can remove all users by clicking twice in the check box next to the Name column header.
» To replace the original Identity Profile with the modified Identity Profile definition, click Save.
» To add the modified Identity Profile as a new Identity Profile, leaving the original unchanged, click
Save As Copy. This button appears only on the Edit Identity Profile page.
Click
Cancel to return to the previous page without making any further changes.
Note:
To have your changes affect currently connected clients, you must go to either the Rights Setup
page or the Client Status page and click Refresh User Rights Now. Otherwise, any changes you make take
effect the next time a client gets new rights.
Users in the Built-In Database
Many organizations choose to authenticate their wireless users against a corporate database or
authentication service. However, if you do not plan to use such a service, you can add users to the
database built into the 700wl Series system and use that for authentication.