
TMS zl Management and Configuration Guide ST.1.1.100226


7-195
Virtual Private Networks
Configure a GRE Tunnel
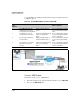
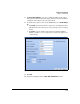
4. If you have selected Network or Host, type the Destination Address, which
depends on the destination type that you chose:
• Network—type the IP address and subnet mask of the destination
network (behind the remote tunnel gateway).
• Host—type the IP address of the host (behind the remote tunnel
gateway).
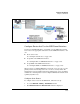
The correct address corresponds to 4 in the example figure.
5. For Gateway Address, type the tunnel IP address of the remote tunnel
gateway (indicated by 6 in the figure).
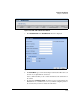
6. For Metric, type a value to represent the distance to the destination
address.
If this is a route over a backup GRE tunnel and the primary tunnel also
uses a static route, type a higher value than that used in the primary route.
7. For Distance, type the administrative distance.
Typically, the distance for a static route is 1. However, if this is a route
over a backup GRE tunnel, type a higher value than that for the primary
route. For example, if the primary tunnel runs OSPF, type a value higher
than OSPF’s administrative distance (by default, 110).
8. Click OK. The route is now displayed in the Network > Routing > Static Routes
window.
9. Click Save.
Move on to the next task: “Create Access Policies for a GRE Tunnel” on page
7-200.
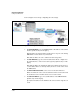
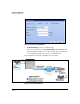
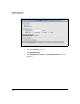
Configure RIP on a GRE Tunnel Interface
This section includes the most basic steps for configuring RIP on a GRE tunnel
interface. Often you must complete more steps such as redistributing con-
nected routes. For complete instructions for RIP configurations, see
Chapter 9: “Routing.”
1. Click Network > Routing and click the RIP tab.