
TMS zl Management and Configuration Guide ST.1.1.100430

9-48
Routing
OSPF
To edit an existing OSPF firewall access policy, complete the following:
1. Click one of the following:
• Firewall > Access Policies > Unicast
• Firewall > Access Policies and click the Multicast tab.
2. Find the OSPF policy that you want to edit and click the Edit icon.
3. Edit the fields that you want to change.
4. Click Apply, then click Close.
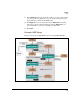
You can also add another OSPF firewall access policy. For example, if you
wanted to deny unicast LSAs from network 10.18.154.0/24 in Zone1 to
10.6.3.0/24 in the Internal zone, you would do the following:
1. Click Firewall > Access Policies > Unicast.
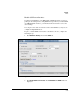
2. Click Add a Policy. The Add Policy window in displayed with the Basic tab
is selected.
3. From the Action list, select Deny Traffic.
4. From the From list, select Zone1.
5. From the To list, select Internal.
6. Under Matching Criteria, from the Service list, select ospf.
7. Under Matching Criteria, select the following:
a. For Source, click Options and click Enter custom IP, IP/mask or Range.
Then type 10.18.154.0/24.
b. For Destination, click Options and click Enter custom IP, IP/mask or
Range. Then type 10.6.3.0/24
c. Optional: In the Source Ports fields, type 1 or the port number that
your network uses for OSPF.
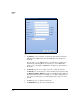
8. Select the Enable this Policy check box to enable the access policy.
9. Optionally, select the Enable IPS for this Policy check box to enable IPS to
check packets on this policy.
10. Optionally, select the Enable logging on this Policy check box to log access
policy activities.
Note It is not recommended that you enable logging permanently, because
policy logging is processor-intensive. Use logging for troubleshooting and
testing only.