
TMS zl Management and Configuration Guide ST.1.1.100430

7-301
Virtual Private Networks
GRE Examples
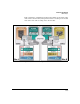
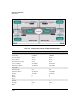
Table 7-29 shows the tasks that you must complete to configure the TMS zl
Module at each site for this example configuration.
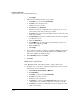
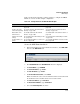
Table 7-29. Configuration Tasks for GRE with OSPF Example
Create the GRE Tunnel for Site A
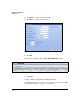
1. In the left navigation pane of the Web browser interface, click VPN > GRE.
You are at the GRE Tunnels tab.
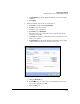
Figure 7-258. VPN > GRE > GRE Tunnels Window
2. Click Add GRE Tunnel. The Add GRE Tunnel window is displayed.
3. For Tunnel Name, type toVLAN40.
4. For Tunnel IP Address, type 10.8.8.1.
5. For Peer IP Address, type 10.8.8.2.
6. For Firewall Zone Association, select Zone4.
This zone will be the source zone for traffic that arrives on the tunnel and
the destination zone for traffic that is sent across the tunnel.
7. For Source IP Address, type 172.23.99.99.
8. For Destination IP Address, type 192.168.33.22.
9. Select the Enable Keepalive check box.
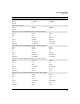
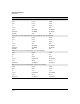
Configuration task Steps for Module A Steps for Module B
Create a GRE tunnel. See “Create the GRE Tunnel for Site A” on
page 7-301.
See “Create the GRE Tunnel for Site B” on
page 7-314.
Create a route to the
remote tunnel gateway.
See “Create a Route to the Remote Tunnel
Gateway” on page 7-302.
See “Create a Route to the Remote Tunnel
Gateway” on page 7-315.
Enable OSPF on the
tunnel interface.
See “Enable OSPF on the Site A Tunnel
Interface” on page 7-303.
See “Enable OSPF on the Tunnel for Site B” on
page 7-316.
Configure other OSPF
settings.
See “Configure Other OSPF Settings for Site
A” on page 7-305.
See “Configure Other OSPF Settings for Site B”
on page 7-318.
Create firewall access
policies.
See “Configure Firewall Access Policies for
Site A” on page 7-307.
See “Configure Firewall Access Policies for Site
B” on page 7-320.