
TMS zl Management and Configuration Guide ST.1.2.100916


7-210
Virtual Private Networks
Configure a GRE Tunnel
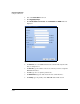
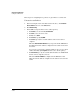
g. Click the Advanced tab.
h. For TCP MSS, type the value that you determined is best for your
system. For example, type 1436.
i. Click the Basic tab.
8. Click Apply.
9. If you enabled a dynamic routing protocol (RIP or OSPF) on the tunnel,
ensure that access policies permit this traffic between SELF and the
tunnel zone. (This is the default setting.)
10. In the Add Policy window, click Close.
11. Click Save.
Multicast Access Policies
If the GRE tunnel will carry multicast traffic, complete this section.
1. Configure an access policy to permit local traffic that is sent across the
tunnel (before it is encapsulated by GRE):
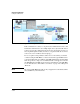
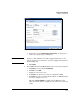
a. Click Firewall > Access Policies > Multicast.
b. Click Add Policy.
c. For Action, accept the default, Permit Traffic.
d. For From, select the local zone.
e. For To, select the tunnel zone.
f. For Service, accept the default, Any Service.
This is the most basic configuration. You could also permit only
certain types of traffic.
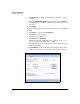
g. For Source, specify the local IP addresses that are allowed to send
traffic on the tunnel.
h. For Destination, specify the appropriate multicast address.
If you have selected a specific service, you can also leave Any Address
if you choose.
i. Click Apply.
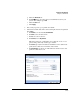
2. Configure an access policy to permit remote multicast traffic that arrives
on the tunnel (after it is unencapsulated from GRE):
a. For Action, accept the default, Permit Traffic.
b. For From, select the local zone.
c. For To, select the tunnel zone.