
TMS zl Module Planning and Implementation Guide 2009-08
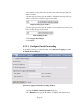
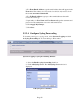
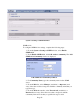
Table Of Contents
- Contents
- Glossary of Acronyms and Abbreviations
- 1.0 Purpose
- 2.0 Intended Audience
- 3.0 Objectives
- 4.0 Prerequisites
- 5.0 Skills
- 6.0 The HP ProCurve Threat Management Services zl Module
- 7.0 Common TMS Security Control Points
- 8.0 Deployment Considerations
- 9.0 Installation and Preparation of the TMS zl Module
- 10.0 Configuration of the TMS zl Module
- 11.0 Using multiple HP ProCurve Threat Management Services zl Modules
- Appendix A – Additional References
- Appendix B – Sample Company Information Assets Spreadsheet
- Sample “Information Assets” tab (See Embedded “Company Information Assets” Microsoft Excel 2003 spreadsheet)
- “Server Network Details” tab (See Embedded “Company Information Assets” Microsoft Excel 2003 spreadsheet)
- “TMS Zones” tab (See Embedded “Company Information Assets” Microsoft Excel 2003 spreadsheet)
- “Firewall Rules” tab (See Embedded “Company Information Assets” Microsoft Excel 2003 spreadsheet)
- /Sample “Company Information Assets” Microsoft Excel 2003 spreadsheet
- Appendix C – Information Gathering Tools
- Appendix D - Updating Switch Software
- Appendix E – Emergency Recovery Process
Page 59
6. Click Apply.
7. Click Save.
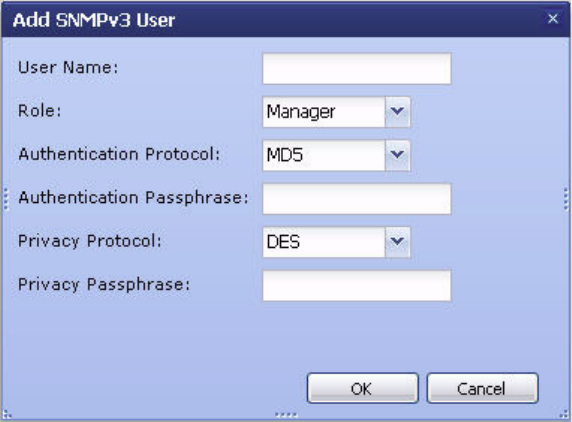
SNMPv3
To configure SNMPv3 settings, complete the following steps:
1. From the System > Settings > SNMP window, select Enable
SNMPv3.
2. Under Enable SNMPv3, click Add another user. The Add SNMPv3
User window is displayed.
Add SNMPv3 User Window
3. For User Name, type the SNMPv3 username for the account.
4. For Role, select the role of the account: Manager (read/write) or
Operator (read only).
5. For Authentication Protocol, select the protocol used for the account:
MD5 or SHA.
6. For Authentication Passphrase, type the authentication passphrase for
the account.
7. For Privacy Protocol, select the privacy protocol used for the account:
None, DES, or AES. For the manager role, you must configure privacy
settings. For the operator role, you may optionally configure privacy
settings, but are not required to do so.
8. If you selected a protocol in the previous step, for Privacy Passphrase,
type the privacy passphrase for the account.
9. Click OK.
10. Click Save.