
WESM xl Getting Started Guide 2007-08

24
Getting Started
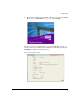
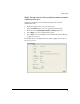
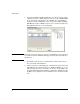
2. Click and highlight Index 1. Select Edit or double-click on the Index line and
an Edit screen appears. WLAN1 is specified in the categories of Configu-
ration, Advanced, Authentication, and Encryption. For this example, enter the
following settings:
• SSID = Faculty1
• Description = Faculty
• VLAN ID = 1
• Encryption = WEP 64-bits (Use the Config button to configure
encryption settings as desired.)
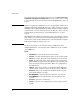
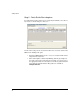
3. Select OK on the Edit screen to return to the Network Setup > WLAN Setup
> Configuration screen.
4. With the line for Index 1 (WLAN1) still highlighted, select the Enable button.
This action causes the "x" in the Enabled column to change to a green check
mark. Select Save to save the settings in non-volatile memory.
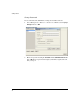
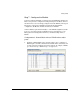
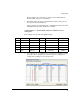
5. To validate that the WLAN has been assigned to the Radio Ports, select
Network Setup > Radio > WLAN Assignment. This screen details the
BSSID and SSID mappings for the radios in the network. By highlighting
a radio (single click), the WLAN Assignment is shown on the far right of
the screen. By holding down the right mouse button and scrolling down
all of the radios, the WLAN Assignment for all radios is shown on the right
side of the screen.
The screen will list all available WLANs (up to 16 WLANs in Normal Mode).