
WESM zl Management and Configuration Guide WT.01.XX and greater


3-27
Radio Port Configuration
Configuring Radio Settings
Note An RP does not have to be adopted before you create a configuration for its
radio (or radios); it can simply be identified in the list. An an unadopted radio
might display in the list because:
■ the module had once adopted the RP
■ you added the RP radio manually using the Add button
To create the configuration, select the unadopted radio, click the Edit button,
and configure the settings. The Wireless Edge Services zl Module deploys the
configuration after it adopts the RP.
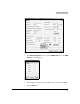
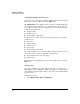
For each RP radio, the Network Setup > Radio screen lists information in these
columns:
■ Index—the radio’s index number, by default assigned in the order in which
radios are adopted
■ Name—a descriptor for the radio. The default name is “RADIOX,” in which
X is the radio’s index number.
■ RP Type—the model of the RP that includes this radio
■ Typ e—the 802.11 mode for the radio
■ Adopted—the radio’s adoption state (a green check mark for adopted and
a red X for not adopted)
■ RP Ethernet MAC—the MAC address on the RP’s Ethernet interface
Use this MAC address to identify the RP for manual adoption.
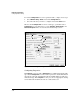
■ Base Radio MAC—the MAC address on the radio. As you can see in
Figure 3-10, two radios can be on the same RP and have the same RP
Ethernet MAC address.
■ State—whether the radio associates with stations (Normal) or exclusively
scans for neighboring APs (Detector)
■ VLAN—the VLAN on which the RP was adopted. By default, the Radio Port
VLAN is 2100. However, you can change the VLAN. If an RP is adopted at
Layer 3, the VLAN column shows a non-Radio Port VLAN.
The Properties section at the bottom of the screen displays the actual settings
that the selected radio is using. For example, you can check the radio’s channel
and transmit power. The Last Adopted field shows in hours, minutes, and
seconds the length of time since the radio was most recently adopted.
The following sections of the guide will explain how to configure settings on
the radio’s Configuration screen.