
WESM zl Management and Configuration Guide WT.01.XX and greater


3-29
Radio Port Configuration
Configuring Radio Settings
Setting the Radio Description. While configuring a radio description will
not affect radio functions, doing so can save time and effort when managing
or troubleshooting your wireless network.
The default radio description is “RADIO” followed by the radio’s index num-
ber. For example, the radio that has been assigned to index 1 has “RADIO1”
as its description. It is often a good idea to describe a radio according to its
intended coverage area or function.
To modify the description, complete these steps:
1. Select Network Setup > Radio and click the Configuration tab.
2. In the Radio Descr. field, enter a text string of up to 20 characters to
describe the radio.
3. Click the OK button.
Dedicating a Radio as a Detector for Unapproved APs. You can dedi-
cate a particular radio to detecting APs in your environment. Such a radio
constantly scans for neighboring APs on all allowed channels, but it does not
support stations.
To enable this function, complete these steps:
1. Select Network Setup > Radio and click the Configuration tab.
2. Select the radio that you want to configure and click the Edit button.
3. Check the Dedicate this Radio as a Detector box.
Note If you enabled this function in the radio adoption default configurations as a
security feature, you can uncheck this box to enable an authorized radio to
support stations.
4. Click the OK button.
Take care. Any stations currently associated with this radio most move to
a different radio or lose their connections.
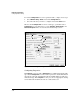
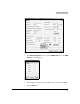
On the Network Setup > Radio > Configuration screen, in the State column, the
radio’s state should change to either Normal or Detector, as you have speci-
fied. (See Figure 3-10 on page 3-26.)